Annotations: Who's doing what, and where
What we're building
Rosa Neves works on two projects. On the website relaunch she's the design lead. On the new mobile app she's a reviewer, signing off the screens before each release. Same Rosa, two different jobs.
So where do we store her "design lead" role? Not on Rosa's page since she's not a design lead everywhere, just on the one project. And not on the project either, since projects don't have a role ... they have team members. So that puts us in a bit of a bind. The "design lead" role doesn't belong to Rosa the person. And it doesn't belong to the website relaunch project. It belongs to the specific context of Rosa working on this one project.
Enter annotations.
Annotations are notes about a specific instance ... kinda like a sticky note.
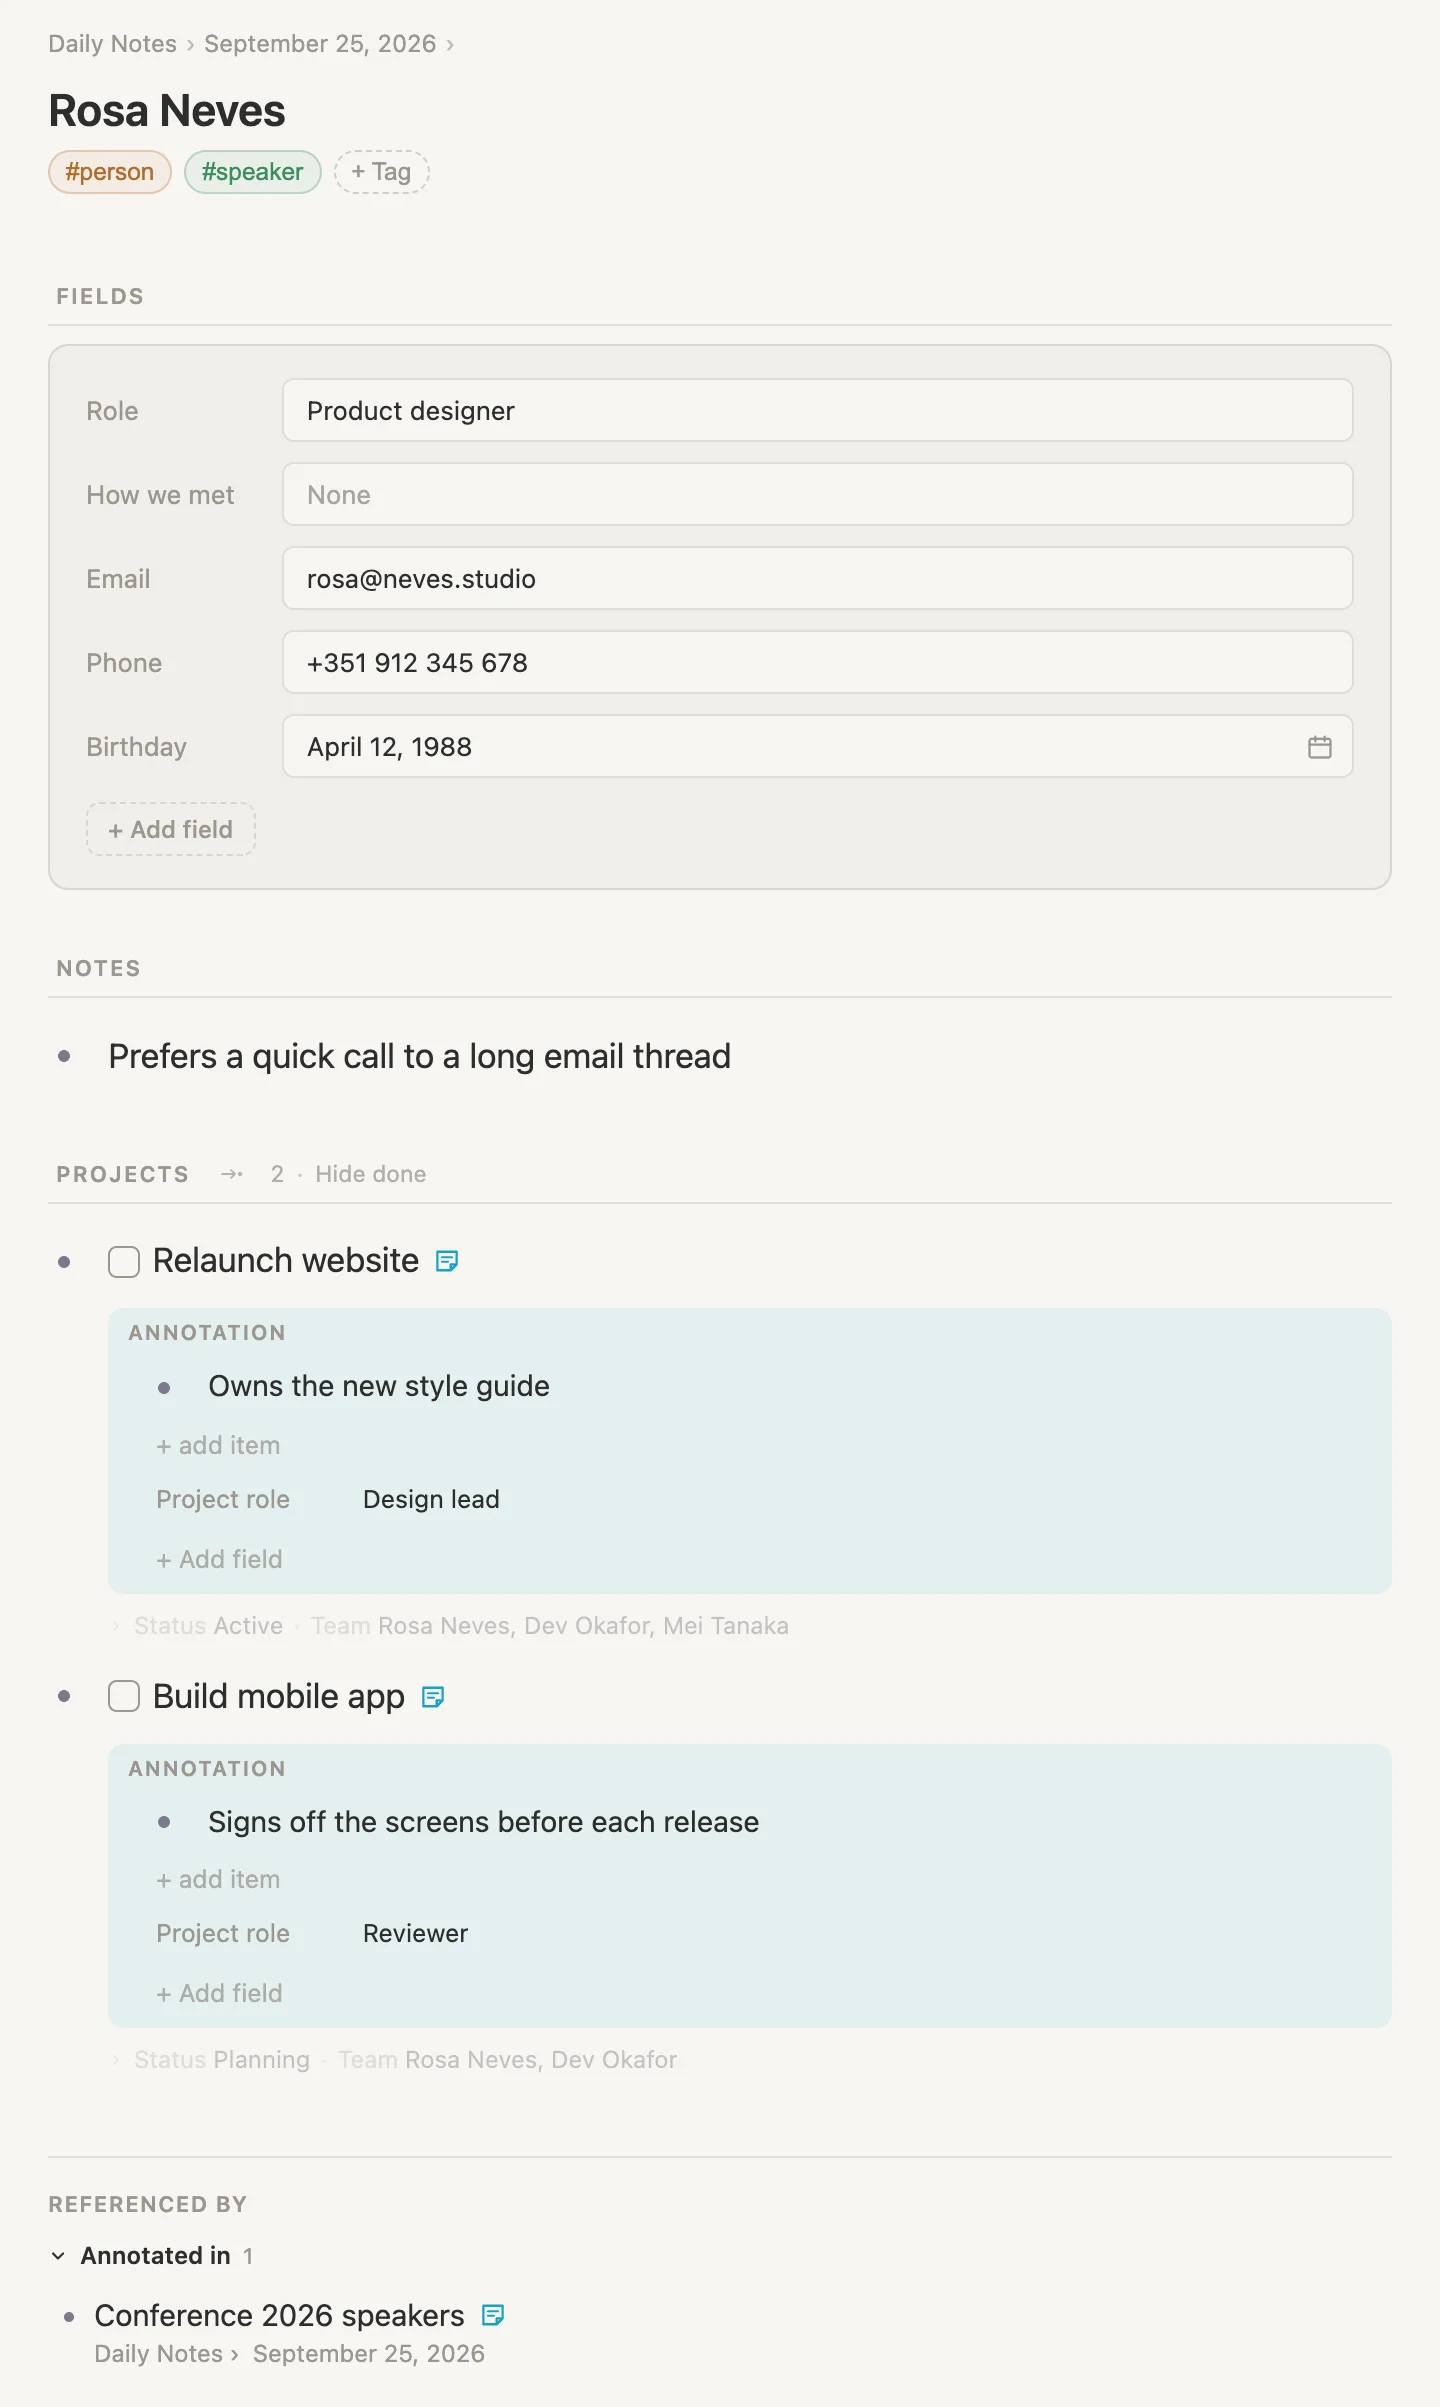
Here's Rosa's page. Up top, the things that are true about her wherever she goes: her role, her email, her phone, her birthday. And below her notes, every project she's on, with what she does on each. Design lead on the relaunch, reviewer on the app. We never typed that list on Rosa's page. Each role was written once, on the project, right beside her name.
(And that last line, Conference 2026 speakers? We'll get to that later, but below is a sneak preview.)
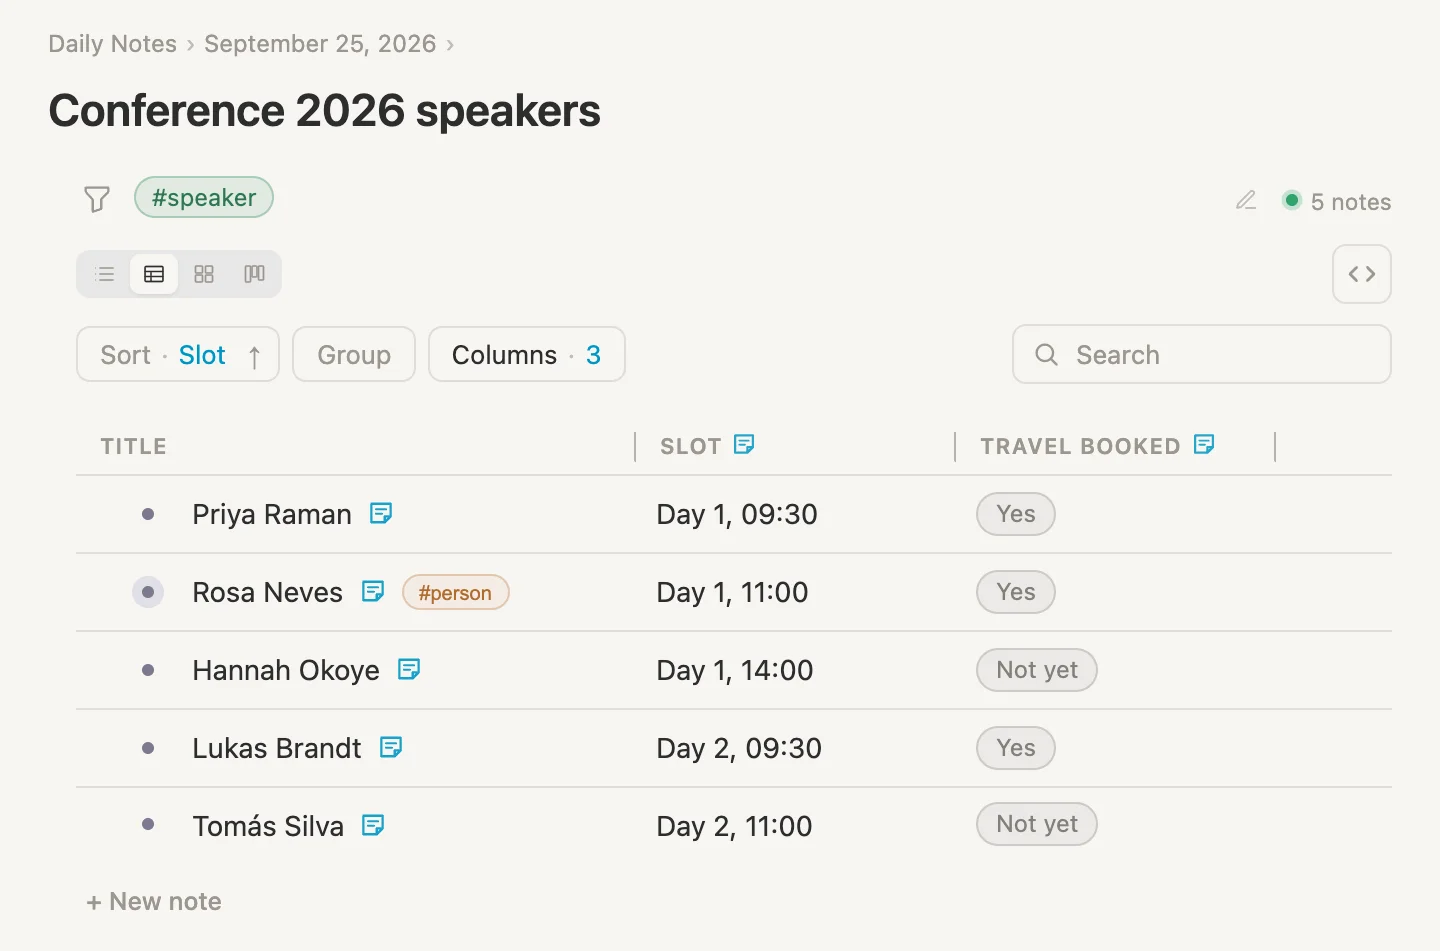
Rosa is also speaking at a conference this year, along with four other people. This is a saved search of everyone tagged #speaker, shown as a table. The Slot and Travel booked columns exist only in this search. What's in those columns is kept in an annotation on each speaker, in this search only (hence the sticky notes). No other note or search gets them, and next year's speaker list can have its own. Sort by Slot, and there's the run of show.
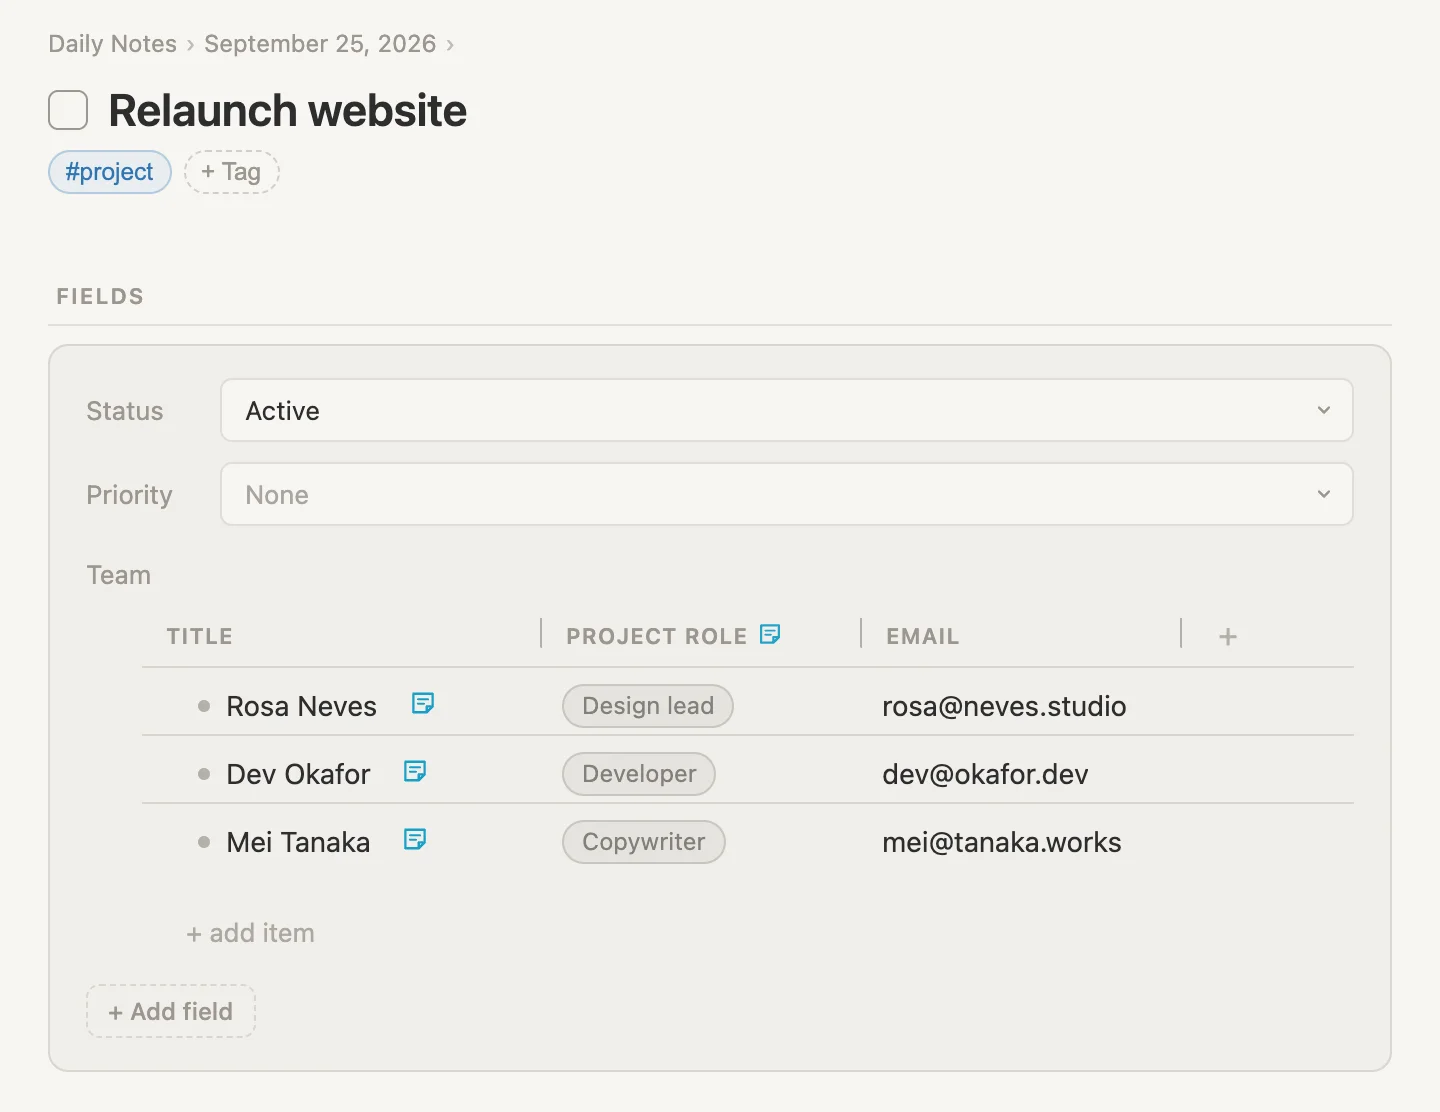
And back on the relaunch, here's its Team field again, this time as a table. Rosa, Dev and Mei are the rows. Again, note the small sticky note beside PROJECT ROLE. That means what's in that column belongs to this project, and no others. That's what annotations allow us to do: contextualized notes about a particular instance. The EMAIL column, on the other hand, is a regular ole field on the #person tag.
That's where we're headed. So let's get started.
NB: Cmd throughout is the Mac key. Use Ctrl on Windows and Linux.
Setting up as we go
Just like the other walkthroughs, we won't set anything up in advance. A new vault already comes with a #person tag and a #project tag, so we'll start with those.
The people
On today's page, click + add item, type Rosa Neves #person, and hit Enter to take #person from the list. Do the same for Dev and Mei.
Then click the bullet dot next to each one to open it, and fill in Role. #person comes with that field in a new vault. It's their job, who they are wherever they go.
| Note to type | Role |
|---|---|
Rosa Neves #person | Product designer |
Dev Okafor #person | Engineer |
Mei Tanaka #person | Writer |
Note that "Product designer" is true of Rosa on every project. "Design lead" won't be, and we'll set that up in a moment.
The projects
Same move: + add item, type Relaunch website #project, Enter. Then Build mobile app #project. Open each one and set its Status: Active for the relaunch, Planning for the app.
A team for each project
A project needs to say who's on it. Click the #project pill, then Schema, then + Add field. Type Team and pick New field "Team". In the card that opens, change Type from text to reference. Then click the box under it that reads Pick a tag, type person and hit Enter.
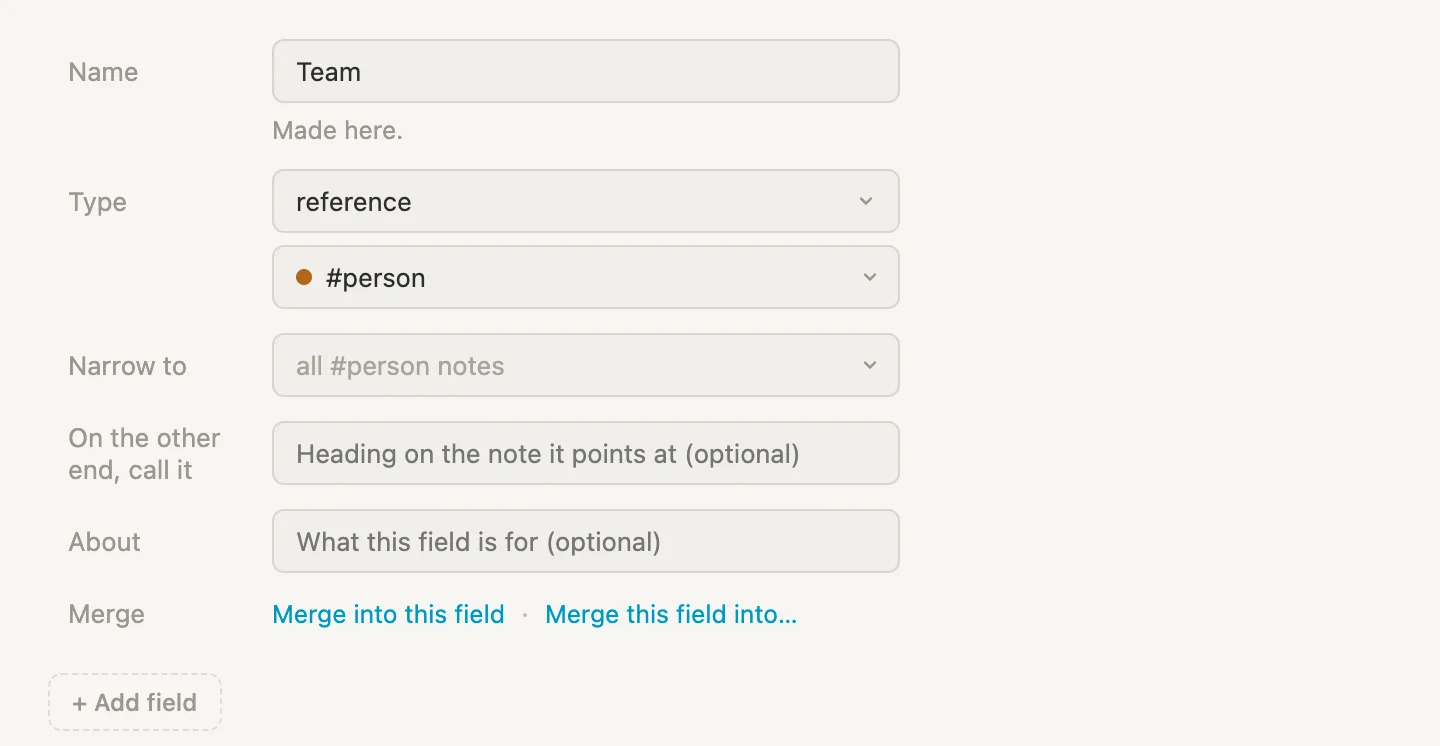
Team now points at people, and only people.
Back to the relaunch. Open it, click None beside Team, type Rosa and hit Enter. The picker stays open for the next one, so type Dev, Enter, then Mei, Enter, then Escape.
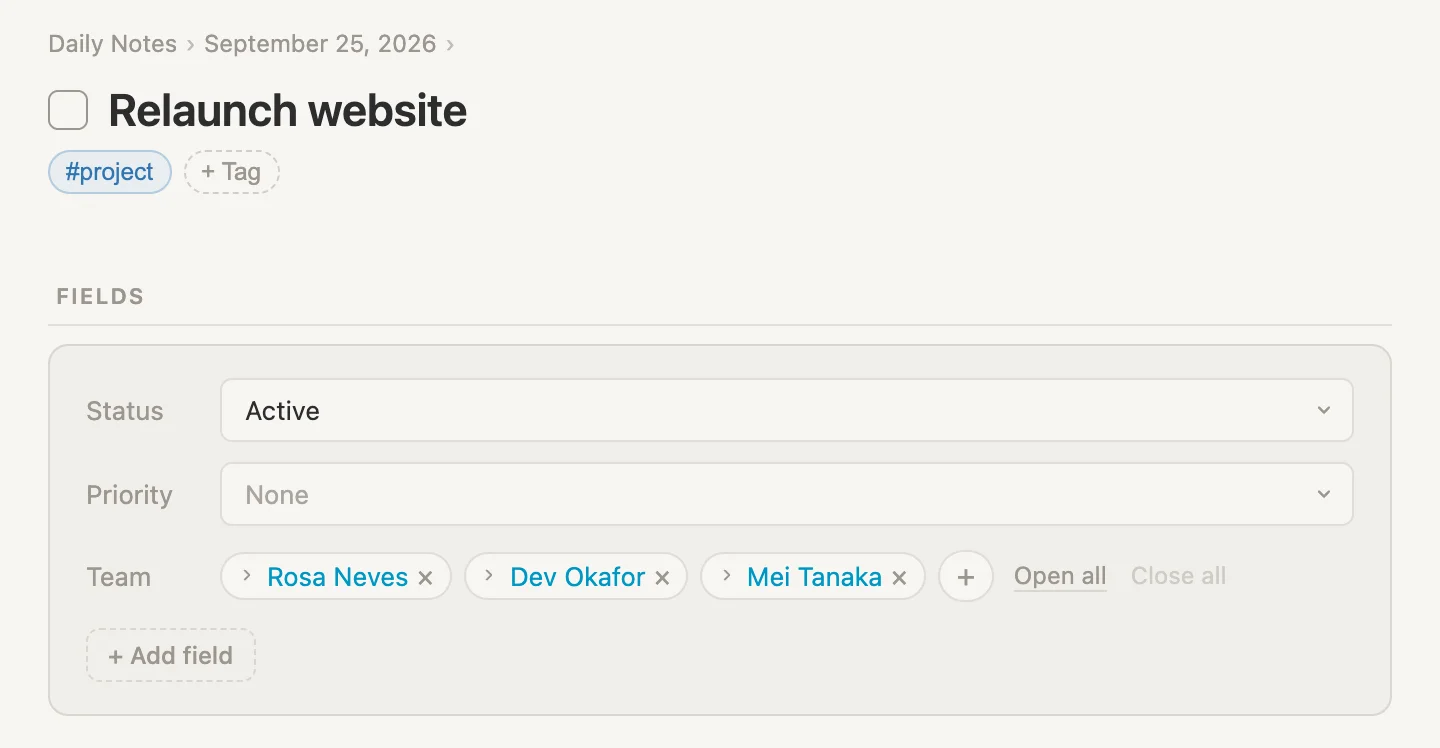
Then the same on Build mobile app, with just Rosa and Dev.
That's the setup. Three people, two projects, one field. Now for the interesting part.
Rosa on the relaunch
Open Relaunch website. In the Team field, click the small arrow at the start of Rosa's pill. (Clicking her name takes you to her page. The arrow opens her right here.) Rosa opens under the field, her Role and How we met and all.
Now move the pointer onto her name at the top of that box. A faint sticky note shows up just after it, beside the little open-page icon. Click the sticky note.
A pale block called ANNOTATION opens, with the cursor already in it. Type Owns the new style guide.
That line is about Rosa, but only on this project. It isn't on her page, and it isn't in the project's notes. It sits on Rosa, in the relaunch's Team field.
A field on the annotation
An annotation can hold fields as well as lines. Click + Add field inside the annotation block, the one beside + add item. (Not the one further down, in Rosa's own fields.) Type Project role and hit Enter to take New field "Project role".
A card opens. Change Type from text to select, and in Options type Design lead, Developer, Copywriter, Reviewer. Click an empty part of the card so the options turn into chips, then click Done.
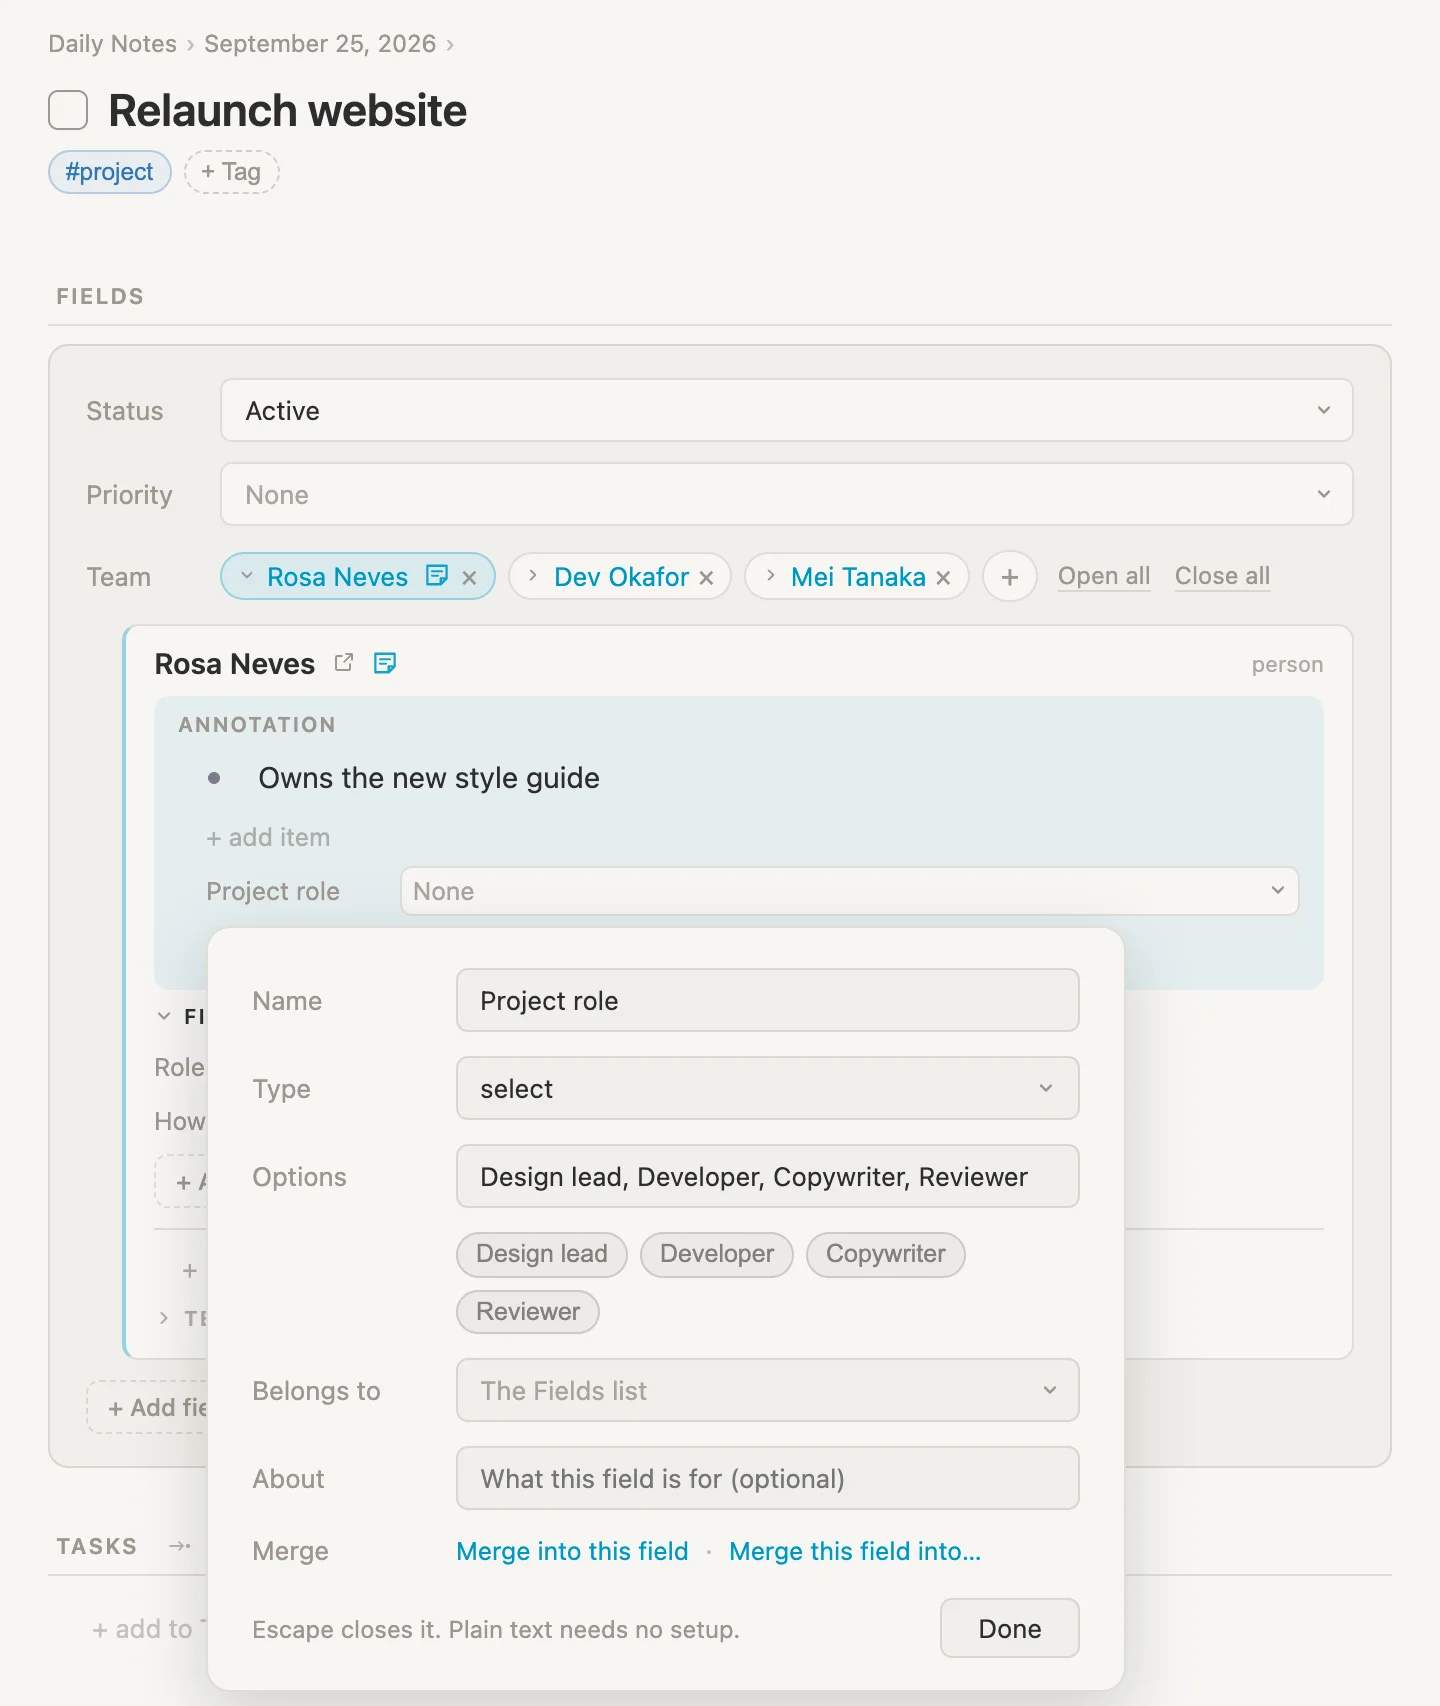
Now Project role sits in the annotation reading None. Click it and pick Design lead.
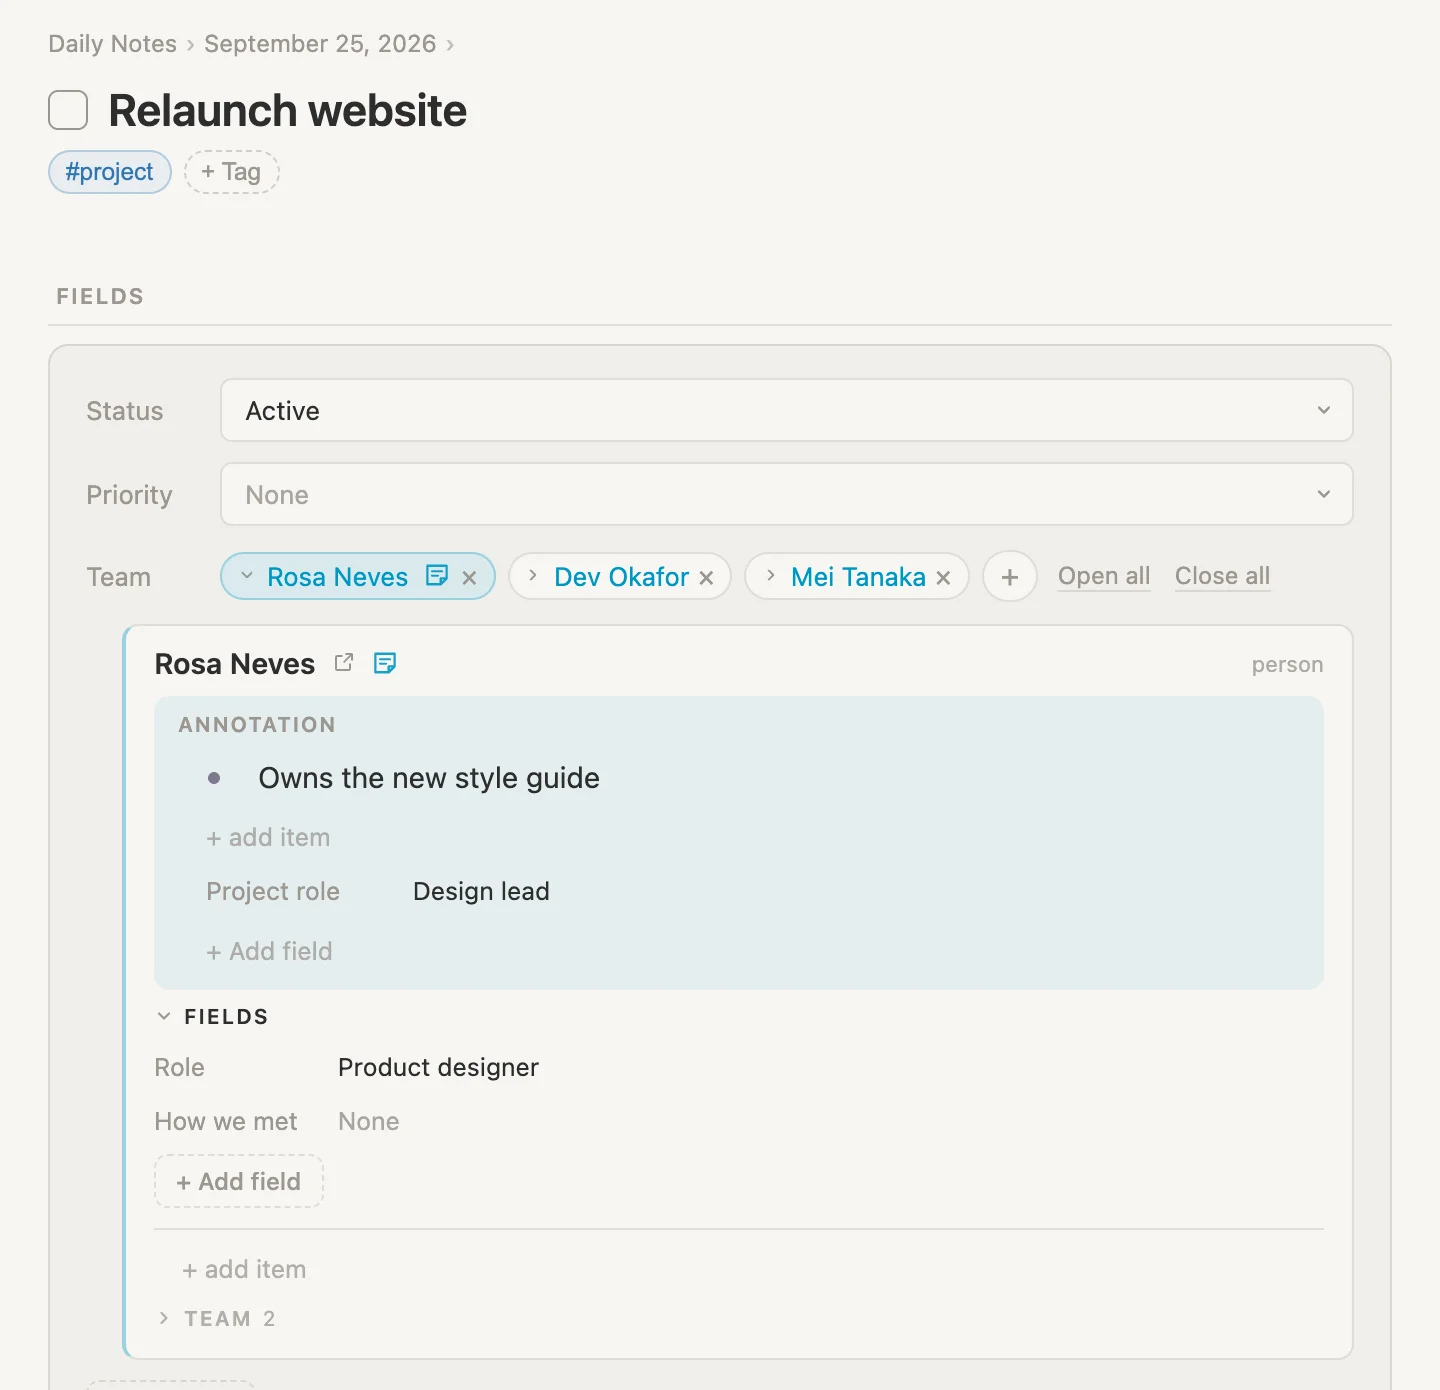
Look just below the annotation, at Rosa's own fields. Role still says Product designer. That's who Rosa is. Design lead is what she does here, on this one project.
Folding it away
An annotation doesn't need to stay open. Click the sticky note after Rosa's name again and the annotation folds away. Then click the arrow on her pill to close Rosa.
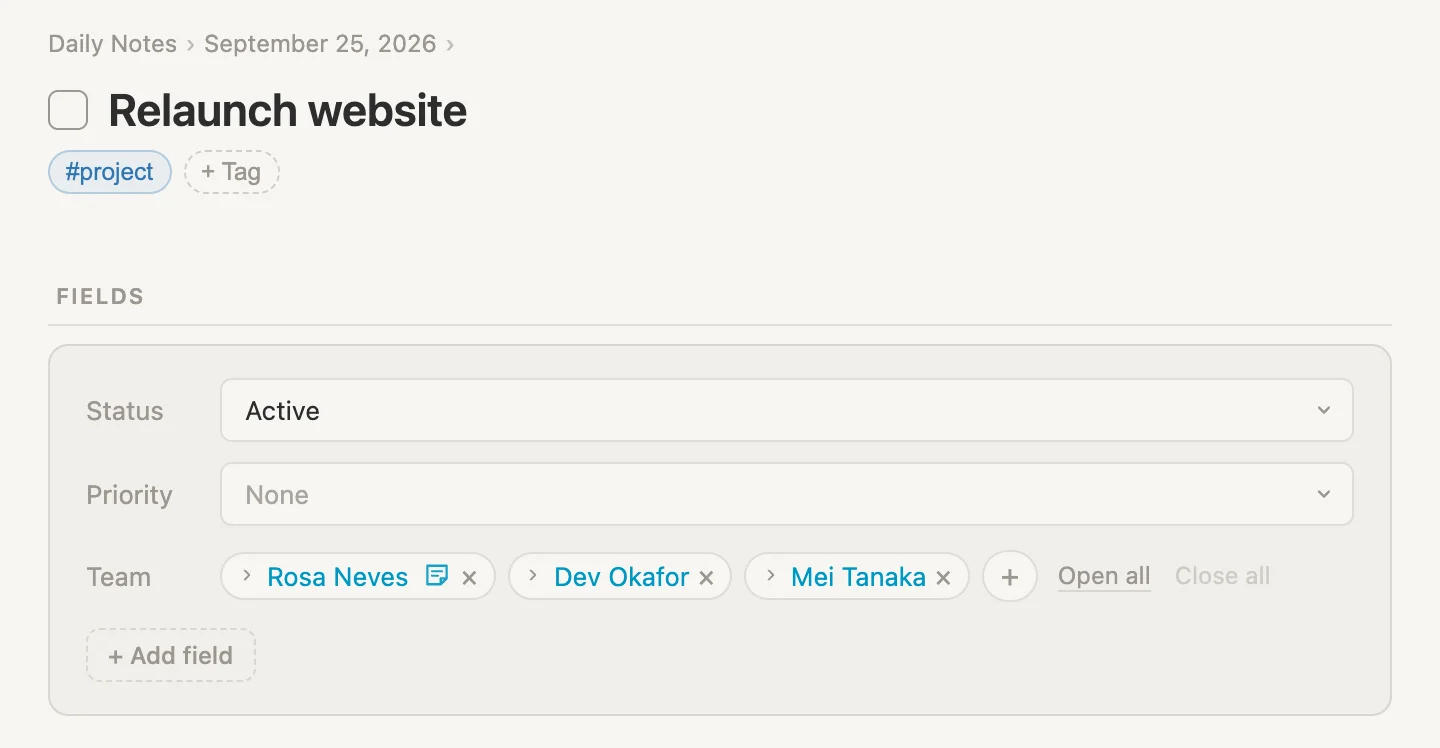
That little sticky note on Rosa's pill says there's an annotation on her here. Dev and Mei don't have one. To read it again, open Rosa with the arrow and click the sticky note after her name.
Rosa on the app
On the app, Rosa is a reviewer. Open Build mobile app and do the same: the arrow on Rosa's pill, the sticky note after her name, and type Signs off the screens before each release.
Then + Add field in the annotation, and type Project role. This time the field already exists, so the list offers Project role itself, marked select · 1 note. Hit Enter to take it, then set it to Reviewer. Fold the annotation and close Rosa.
One Rosa, two projects, two roles. And we never went near Rosa's own page. But let's go there now and see what it says.
Rosa's page
Open the relaunch page again and this time click Rosa's name on her pill, not the arrow. On her page we'll see her Role, How we met, and nothing we typed about projects.
Scroll to the bottom. Under REFERENCED BY there's a group called Team, with a 2 beside it: Relaunch website and Build mobile app. Both projects list Rosa in their Team field, so both turn up here on their own. And each one carries a sticky note after its name. Click both stickies.
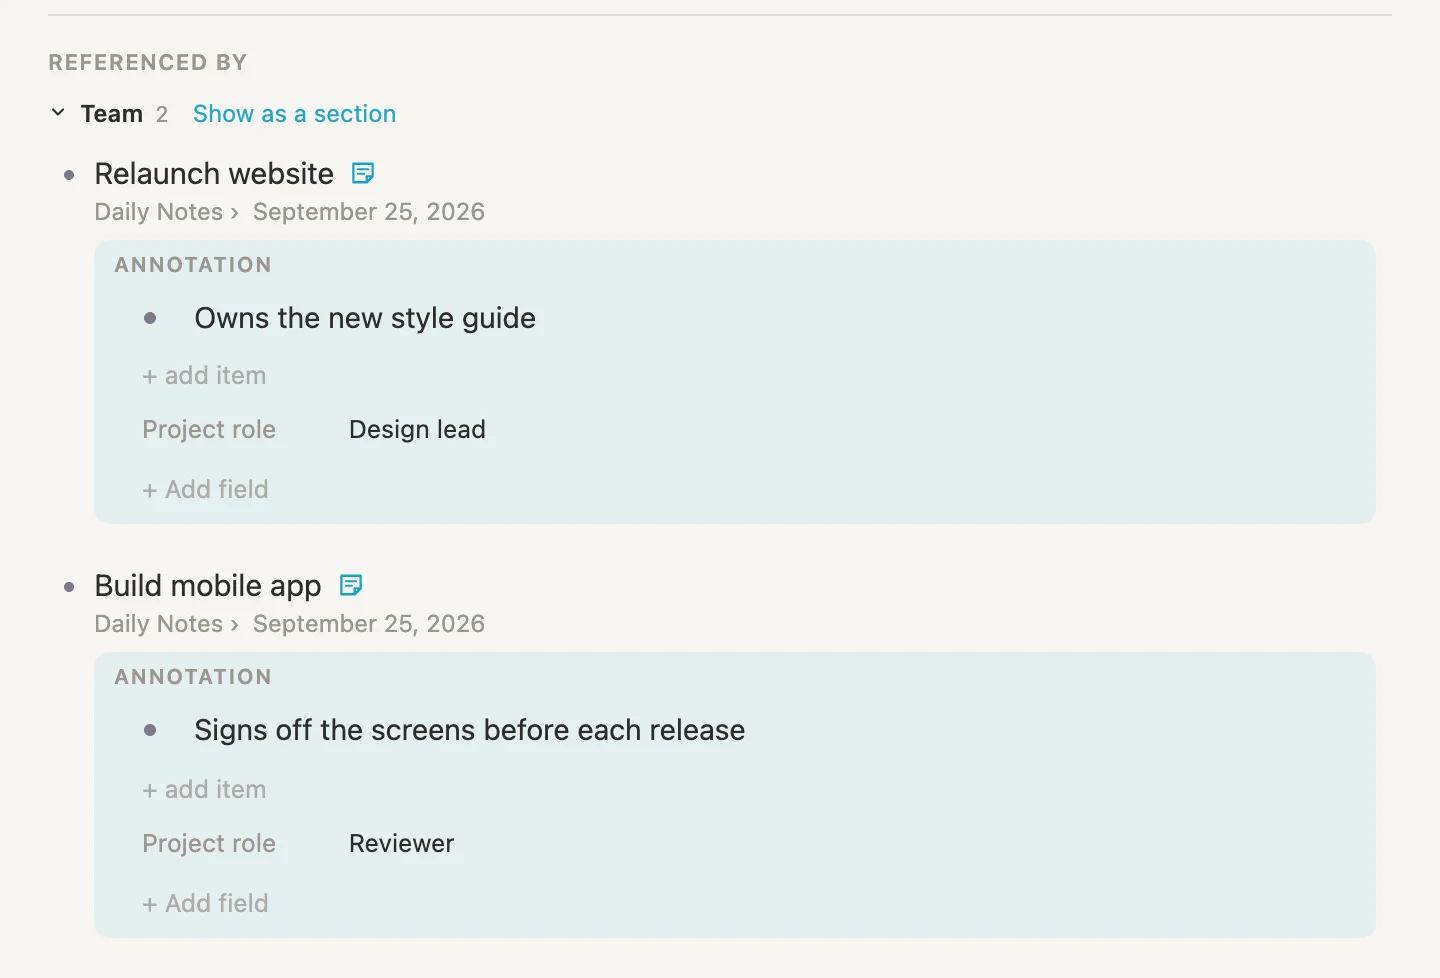
There they are. Design lead on the relaunch, reviewer on the app, each with its line. Neither was written on Rosa's page. They were written on the projects, right beside her name, and her page gathers them up. These are the real annotations, not copies, so a change made here shows on the project as well.
Try doing that with child bullets under Rosa's name on each project. (NOT!)
Naming the other end
"Team" makes sense from the project's side. From Rosa's page it reads a little backwards. She isn't a team. These are her projects. A reference field can go by a different name on the other end.
Click Relaunch website to open it, then click its #project pill, then Schema. In the Team card, find On the other end, call it, type Projects and click away. Back on Rosa's page, the group now reads Projects.
Show as a section
The list at the bottom is handy, but a person's projects deserve better than the foot of the page. Click Show as a section, right beside Projects. It asks where: on every #person or on this note only. Pick on every #person, so Dev and Mei get the same section.
The projects move up into a PROJECTS section of their own, and the list at the bottom goes. The annotations come in folded, because each place on the page keeps its own open and closed. Click the two sticky notes again.
A little tidying
Two small things before we move on.
When it was created, your vault might have given every person a Books section, for the books they wrote. Rosa hasn't written any, so it's just an empty shelf. Click the #person pill, then Schema. Under SECTIONS, click the × at the end of the Books row. The app asks first, Delete "Books"?, and explains that nothing is lost. The books keep their Author, and the pages just stop collecting them. Click Delete.
And give Rosa a note of her own. Back on her page, under NOTES, click + add to Notes and type Prefers a quick call to a long email thread.
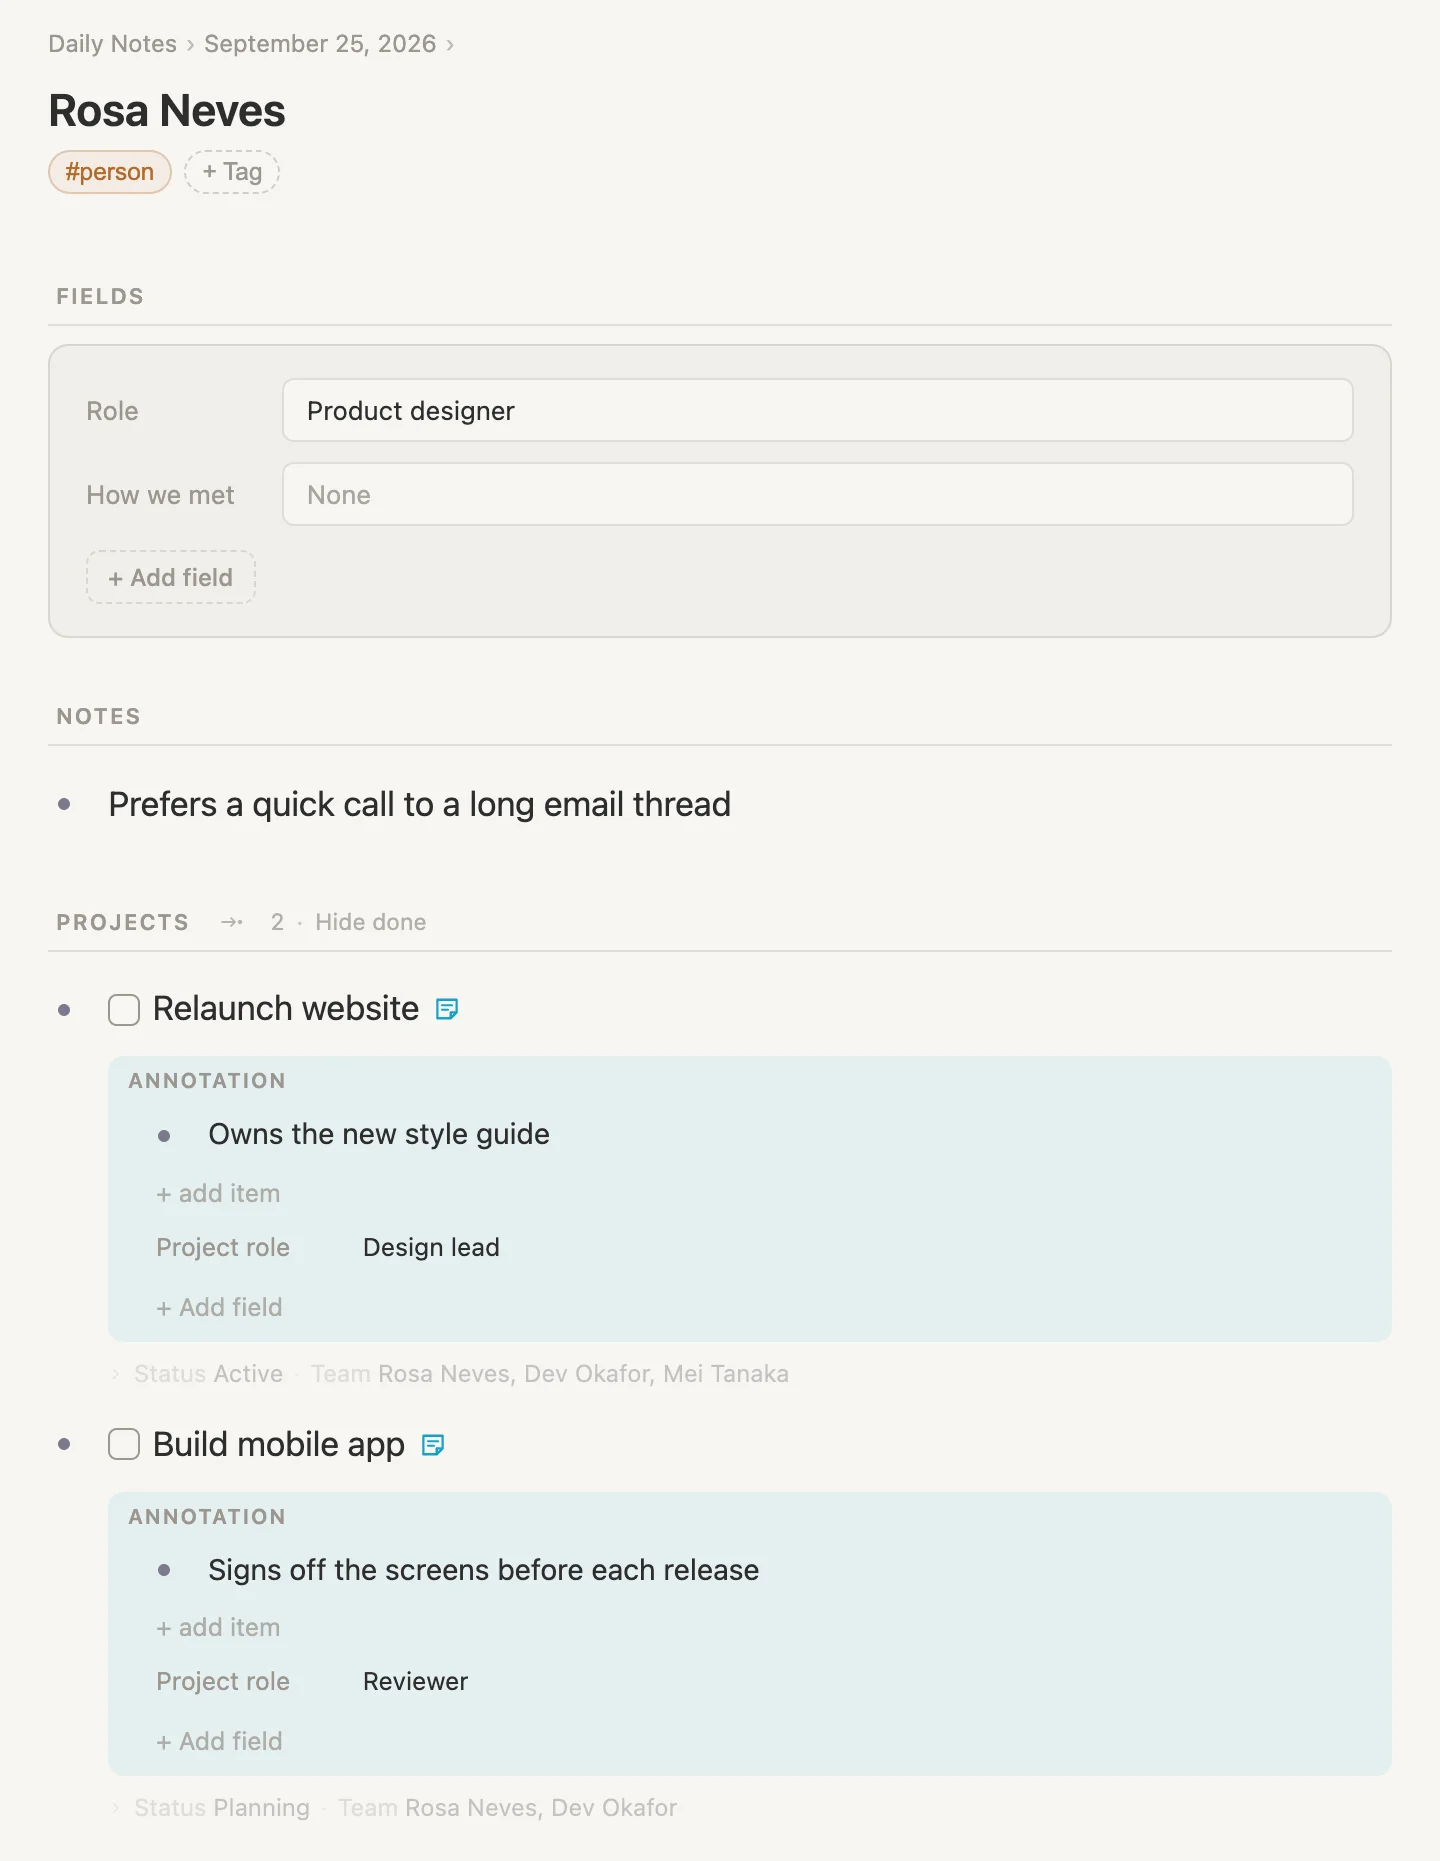
That's nearly Rosa's page from the top of this walkthrough. Her own details, a note about her, and every project she's on with what she does on each. Her email, phone and birthday come later, and so does that last line about the conference. The conference is next.
Conference 2026 speakers
Rosa is also speaking at a conference this year, along with four other people. What we want is one list of everyone speaking, with when each of them is on and whether their travel is booked.
So where does "Day 1, 11:00" go? Not on Rosa. It's only true of this conference, and next year she'll have a different slot, or none at all. It belongs to Rosa in this one list. Same idea as before, but this time the list is a saved search.
The speakers
On today's page, click + add item and type Priya Raman #speaker. There's no #speaker tag yet, so the list offers to make one: Create #speaker. Hit Enter.
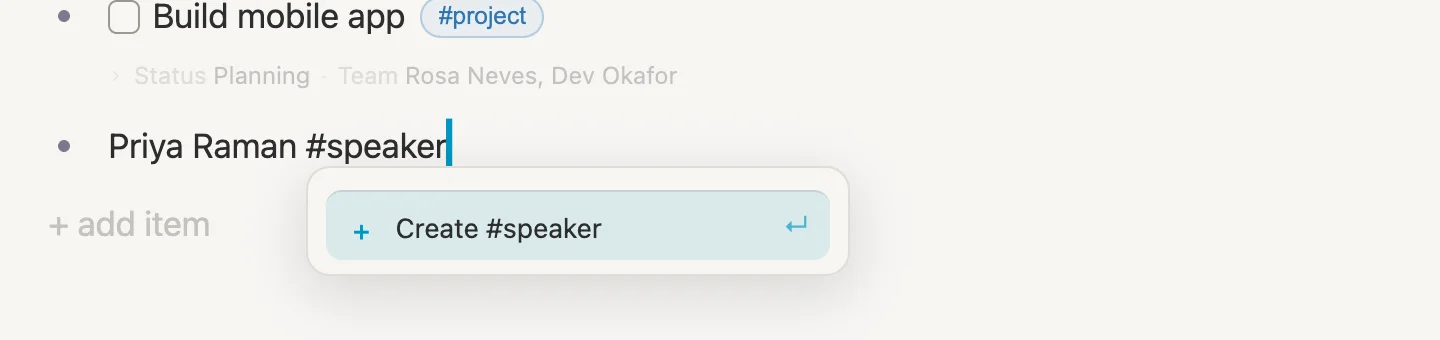
Then the same for Hannah Okoye #speaker, Lukas Brandt #speaker and Tomás Silva #speaker.
Rosa already exists, so she just needs the tag. Open her page, click + Tag, type speaker and hit Enter.
A saved search of everyone speaking
Back on today's page, click + add item, type /search and pick Live search. Its rules open right away, with the + Add filter menu already showing. Choose Tagged…, and set the tag to speaker.
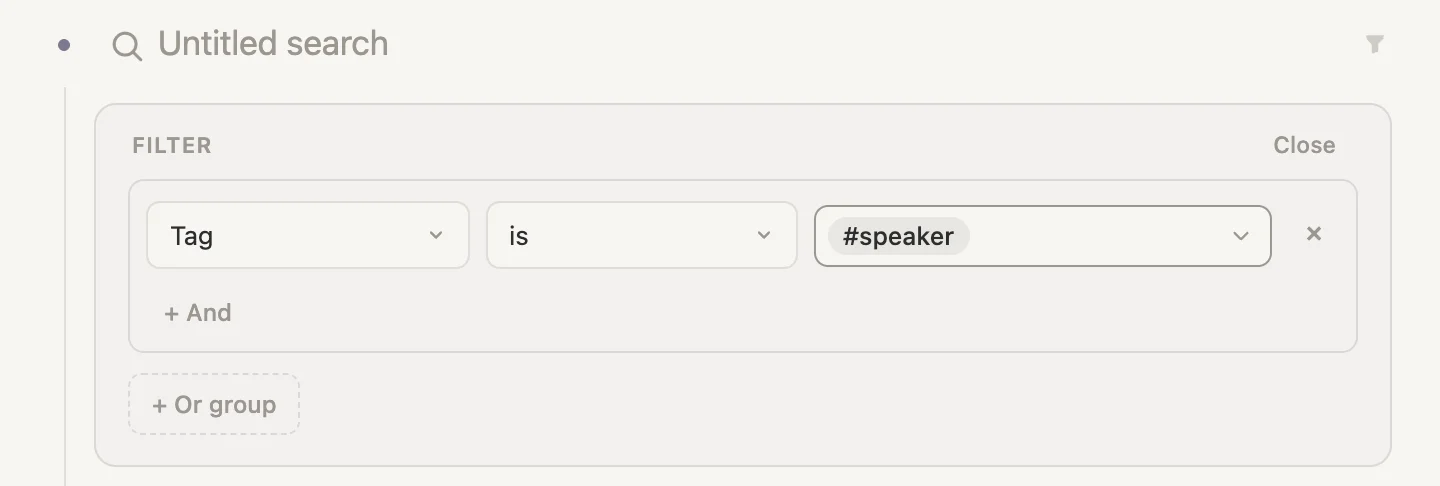
Click Close, then click the name where it says Untitled search and call it Conference 2026 speakers.
Now click its bullet dot to open it on its own page, and click the table icon, the second of the four small icons under the rule. Five speakers, one row each.
Columns that live only in this search
Click Columns, then Add a field…, and type Slot. Two lines come up.
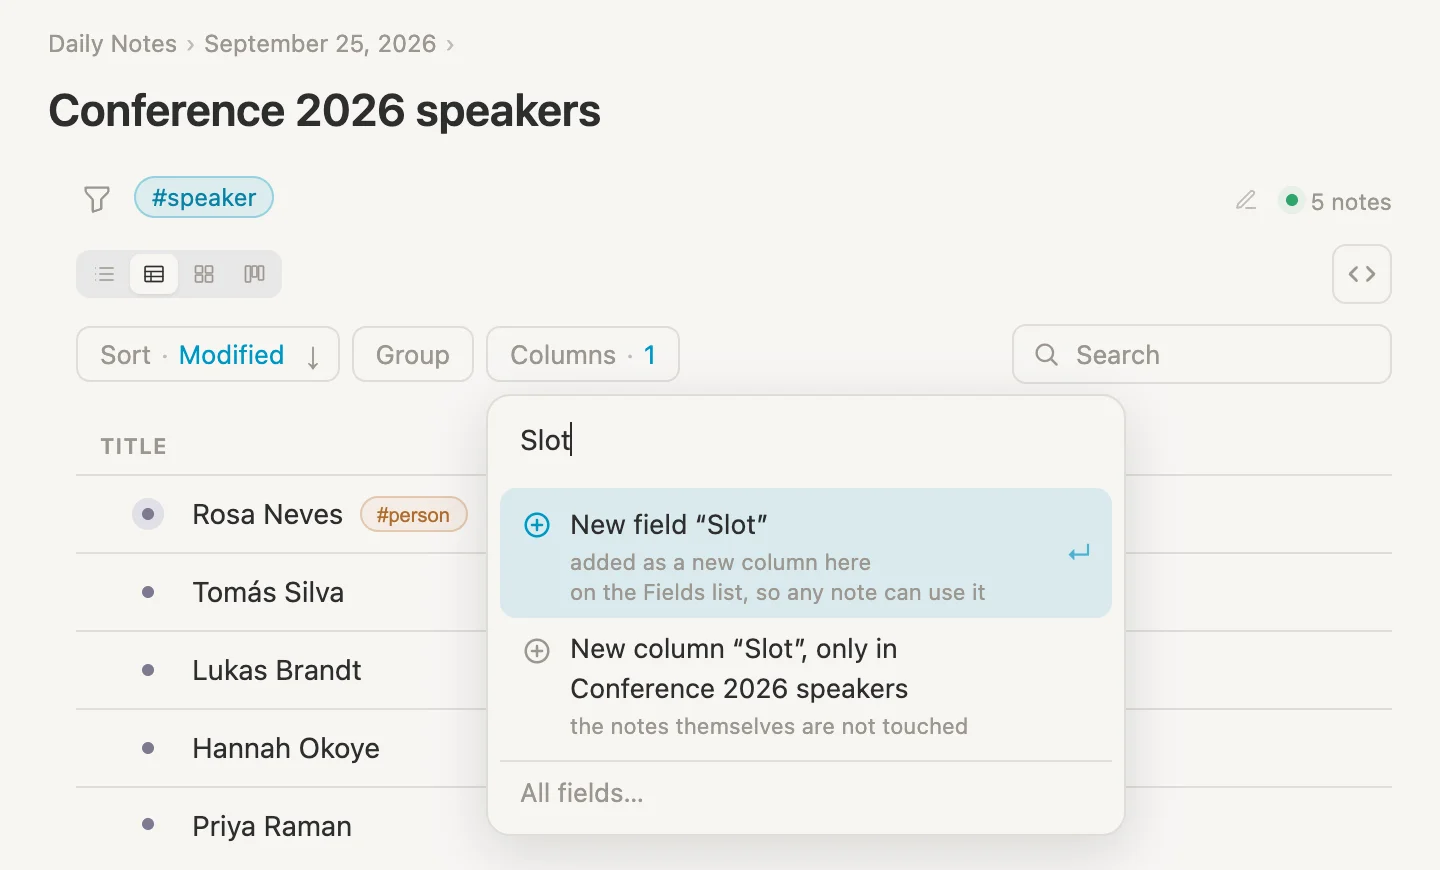
The first, New field "Slot", would make an ordinary field that any note in the vault could use. That's not what we want. The second, New column "Slot", only in Conference 2026 speakers, makes a column that exists in this search and nowhere else, and underneath it the app says so plainly: the notes themselves are not touched. Click the second one (New column "Slot").
A card opens, just like the one for Project role, and Belongs to reads Only in Conference 2026 speakers. Slot can stay as text, so click Done.
Now the same for Travel booked, the second line again. This time change Type to select, type Yes, Not yet in Options, click an empty part of the card, then Done.
The Title column starts out wide, so Travel booked may be cut off at the right-hand edge. Drag the thin line at the right end of the TITLE header to the left until both columns fit.
Filling it in
Now fill the table in right where it is. Click a Slot cell and type. For Travel booked, click the cell, click it again to open its list, and pick.
| Speaker | Slot | Travel booked |
|---|---|---|
| Rosa Neves | Day 1, 11:00 | Yes |
| Tomás Silva | Day 2, 11:00 | Not yet |
| Lukas Brandt | Day 2, 09:30 | Yes |
| Hannah Okoye | Day 1, 14:00 | Not yet |
| Priya Raman | Day 1, 09:30 | Yes |
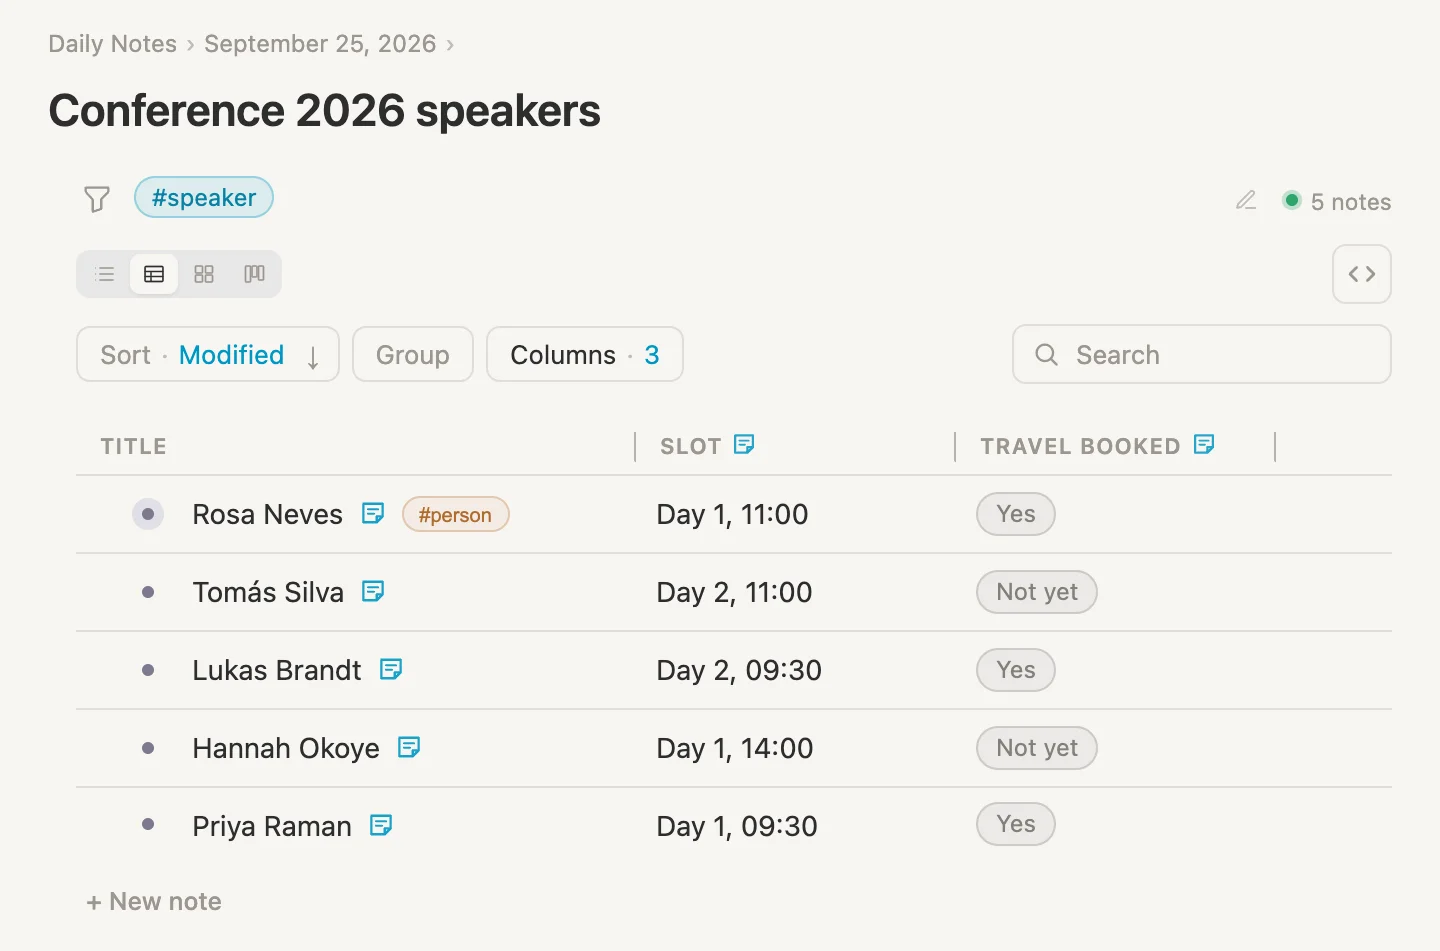
Every speaker now has a sticky note after their name. That's their annotation in this search, and it's where their Slot and Travel booked are kept. Nothing was written on Priya, or Hannah, or any of them.
The run of show
Click Sort, then Slot. If the arrow beside it points down, click it so it points up, earliest first.
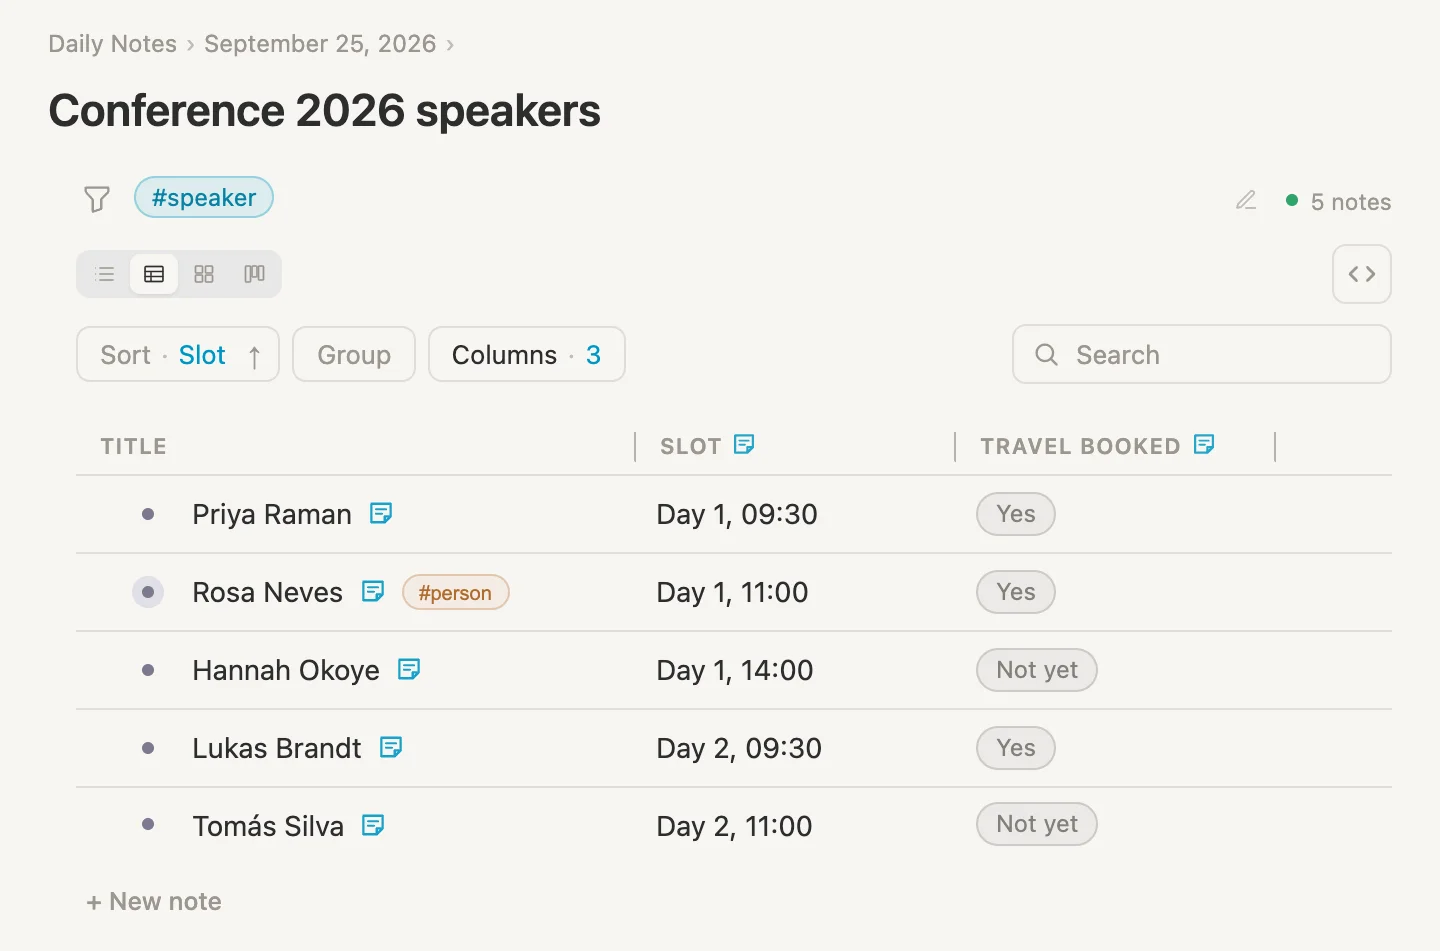
And there's the run of show. We wrote the slots as words, the day first and then the time, so they sort into the right order without any fuss.
Annotated in
Now back to Rosa's page. Scroll to the bottom. There's a new group under REFERENCED BY: Annotated in, with Conference 2026 speakers in it and a sticky note after its name. Click the sticky note.
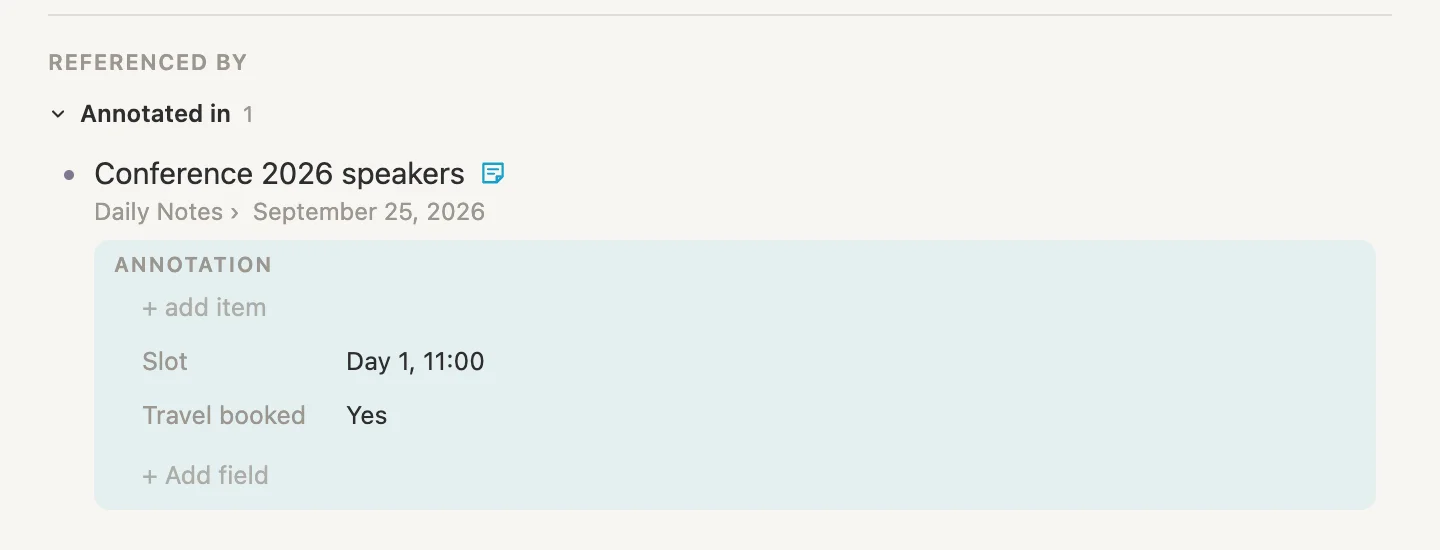
That's Rosa's annotation from the speakers search: Slot Day 1, 11:00, Travel booked Yes. We never came near her page to write it. And it's the real thing, not a copy. Change her slot here and the speakers table changes with it.
So Rosa's page now knows everything we've said about her, wherever we said it. Her own details at the top. What she does on each project. And when she's on at the conference. That's the last line from the picture at the very top.
Finding it again
A week from now, you'll remember that someone owns the style guide but not where you wrote it down. Search reaches inside annotations.
Press Cmd-P and type style guide.
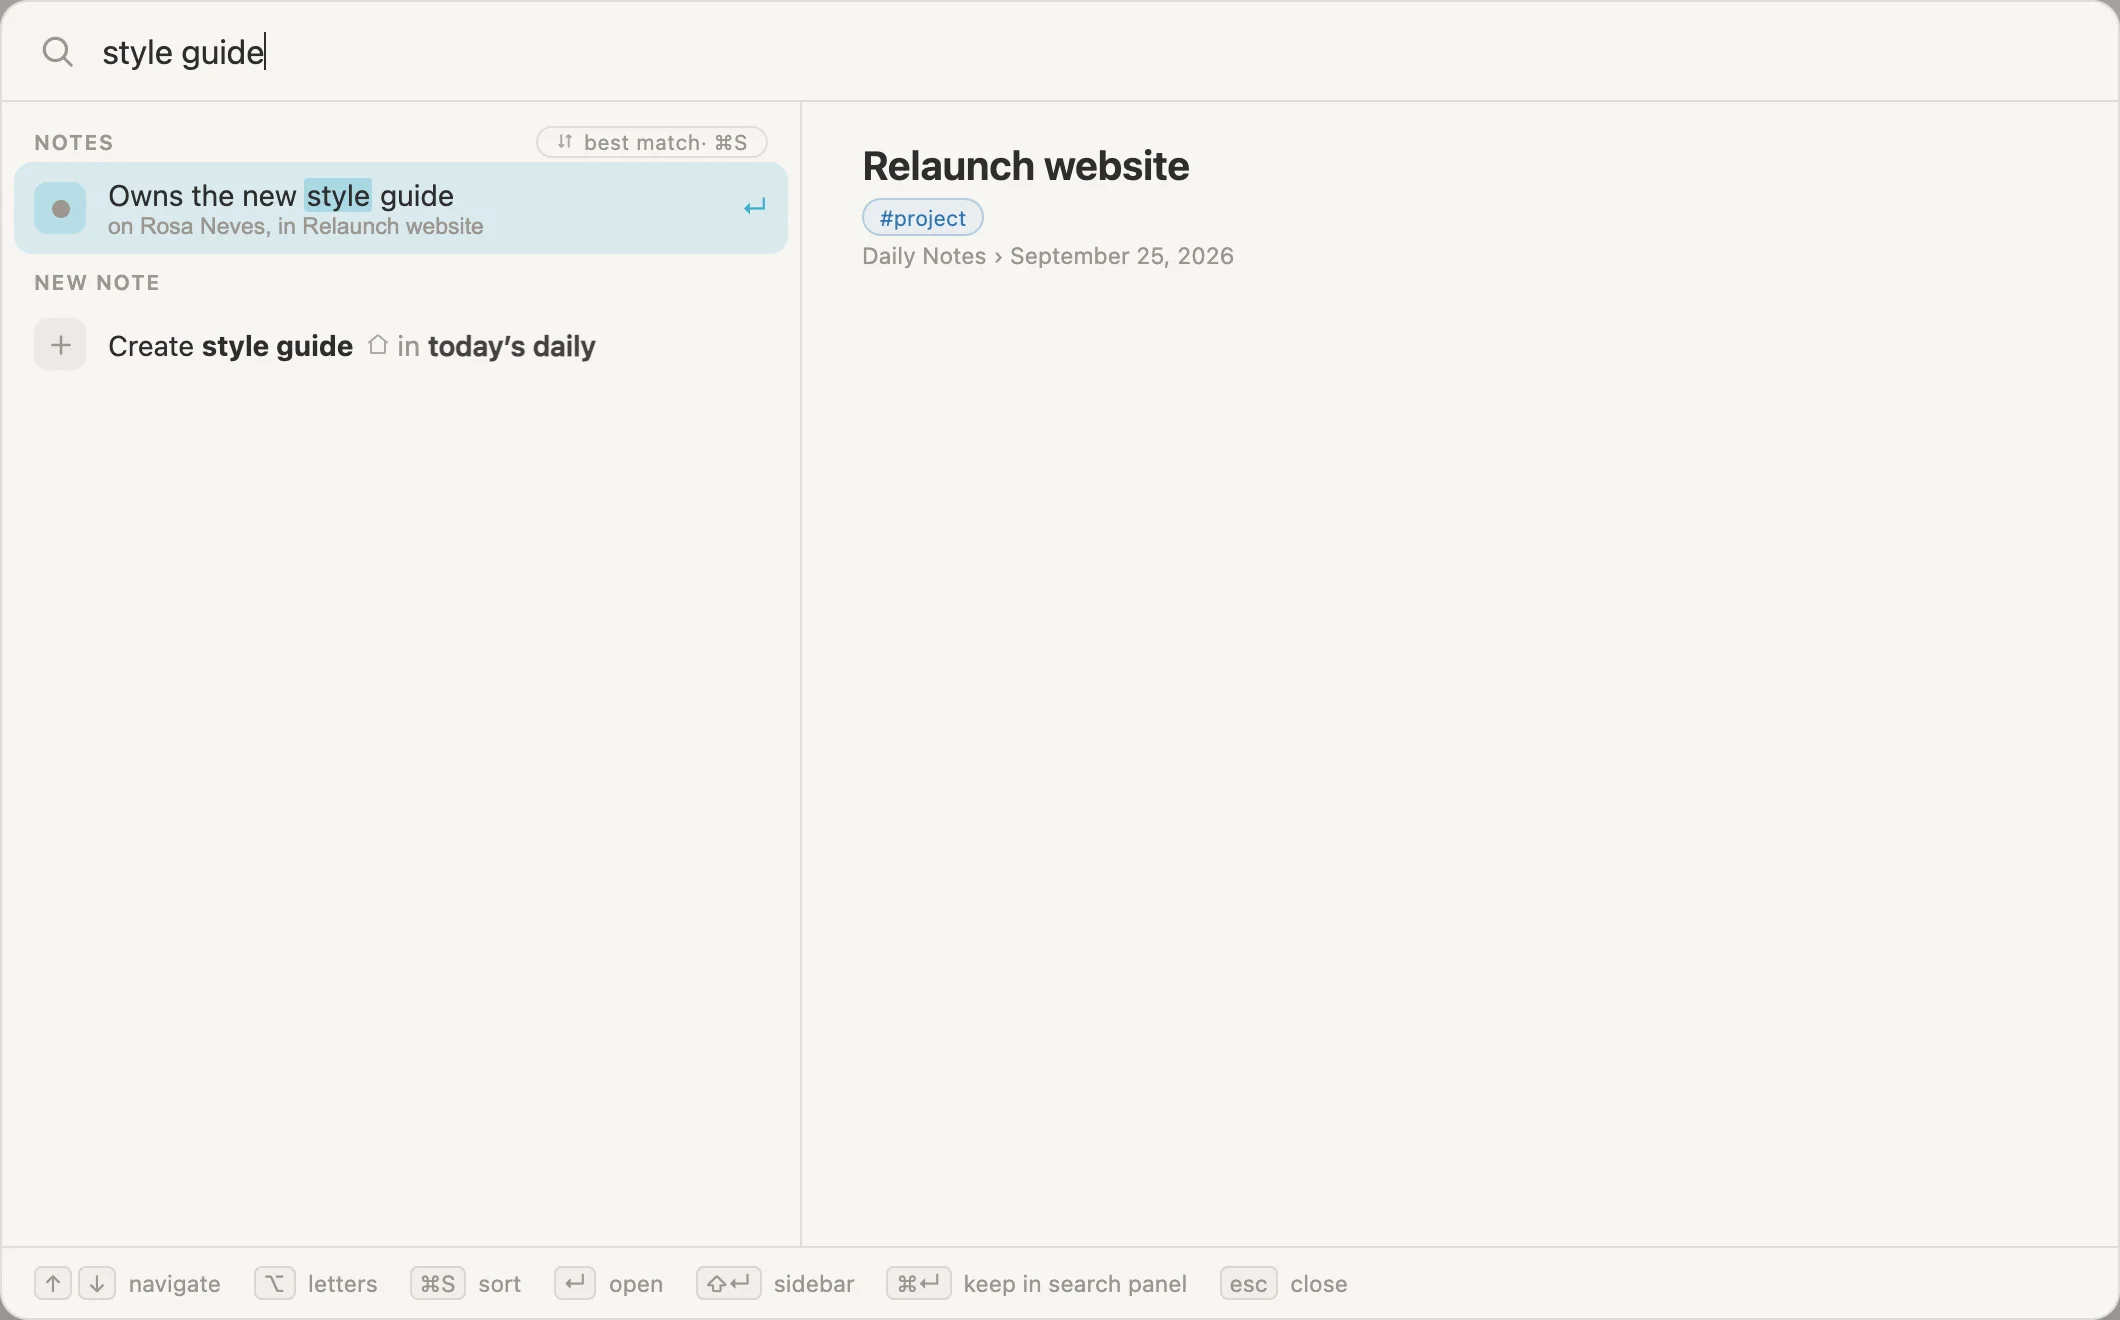
There it is: Owns the new style guide, and under it, where it lives, on Rosa Neves, in Relaunch website. Hit Enter and you land on the relaunch, with Rosa already opened in the Team field and her annotation unfolded, right where you wrote it.
The Team as a table
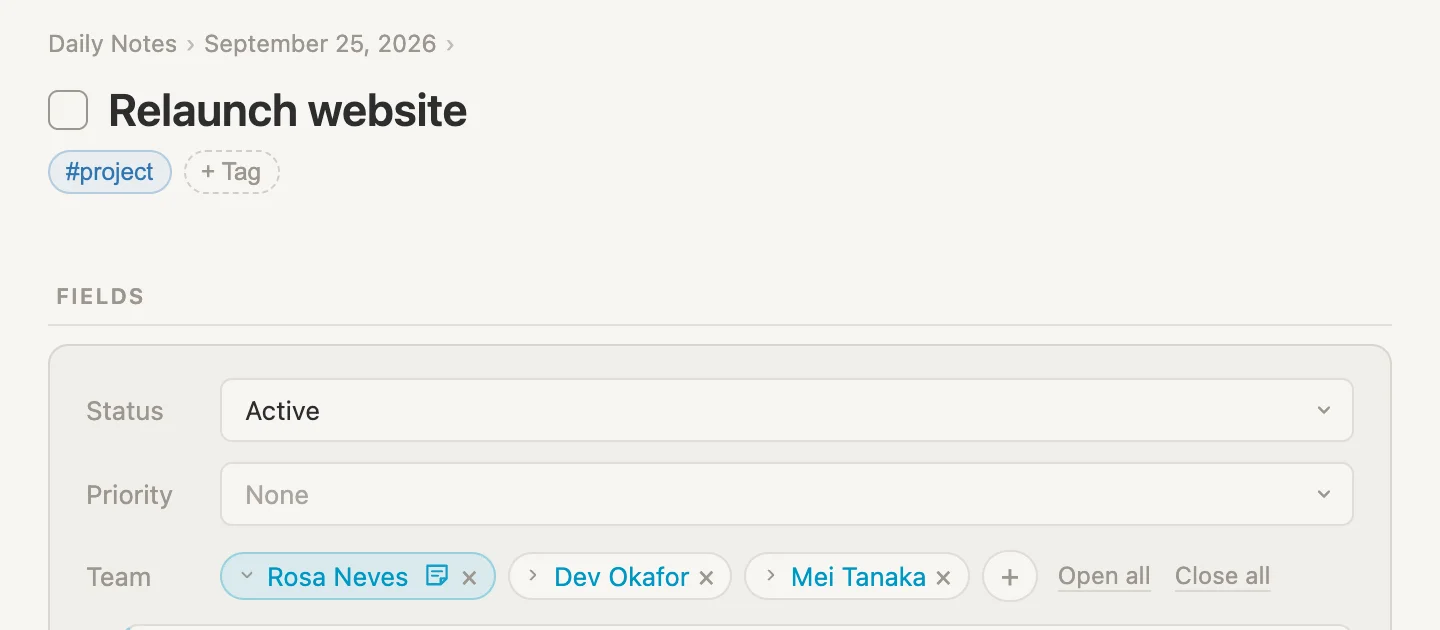
Three names in a row of pills is fine for knowing who's on the relaunch. But a project page is also where we'd want everyone's role and contact details side by side. So let's show the Team field as a table.
A few more details on #person
First, somewhere to keep those details. Click the #person pill on Rosa's page, then Schema, and click + Add field three times:
Email, left as textPhone, left as textBirthday, Type date
Each time, a line comes up reading New field "Email" (then "Phone", then "Birthday"). Hit Enter to take it.
Show Team as a table
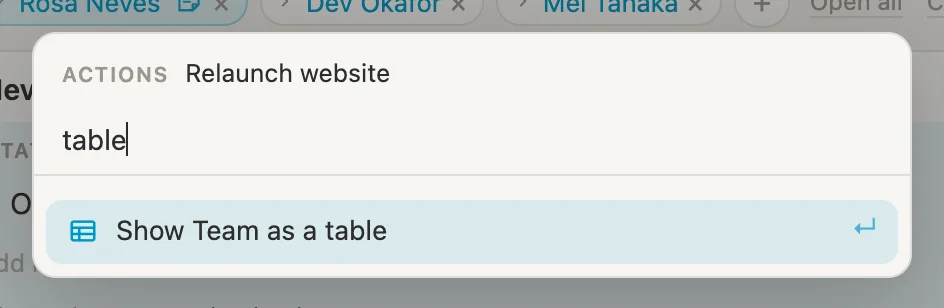
Open Relaunch website, press Cmd-K and type table. Pick Show Team as a table.
The pills turn into a table, one row per person.
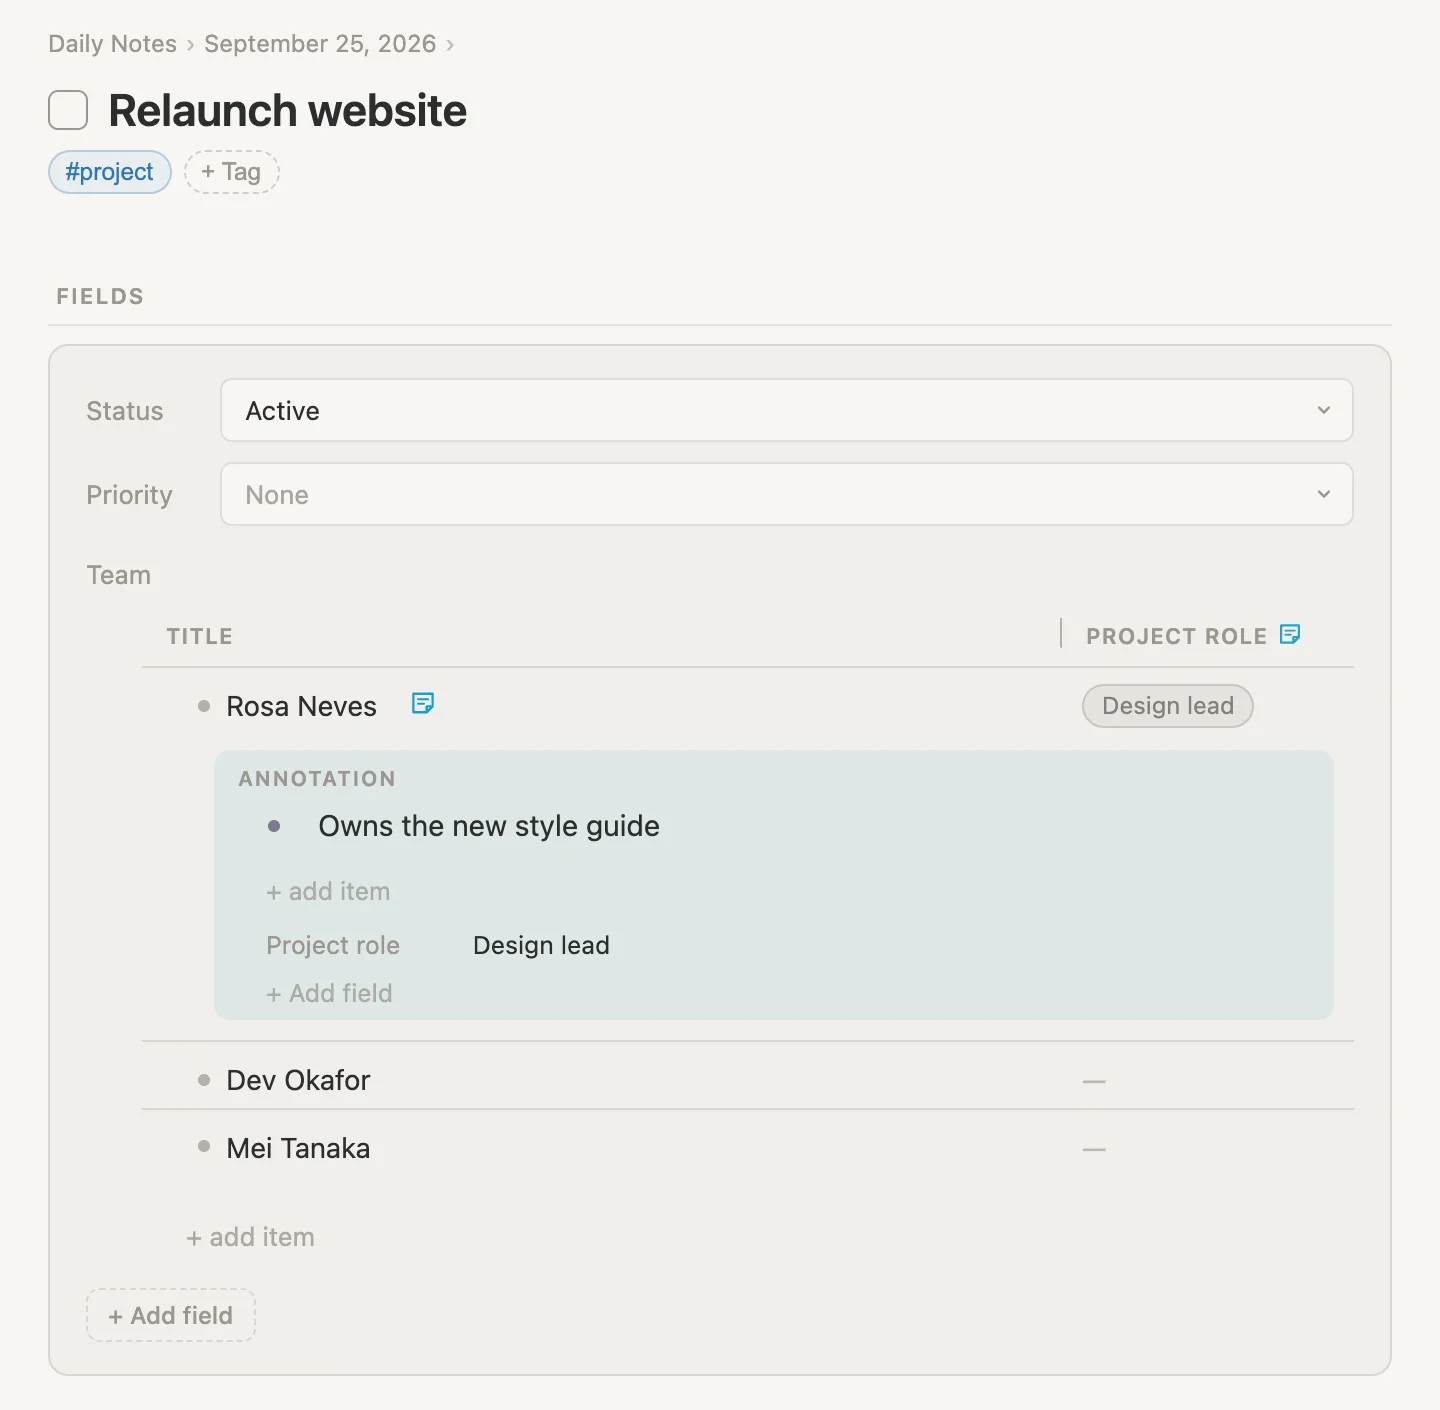
Look at the second column. PROJECT ROLE, with a sticky note beside it. That's the field from Rosa's annotation, and her Design lead is sitting in it. The sticky note in the header says what's in that column is stored on the relaunch project, not on the people.
If Rosa's annotation is still open under her row (search opened it for us a moment ago), click the sticky note after her name to fold it.
And the rest of the columns? They're there, just off to the right. The Title column starts out wide, and the table scrolls sideways.
Making it fit
Drag the thin line at the right end of the TITLE header to the left, until the title column is a bit under half its width. Now ROLE comes into view, with HOW WE MET, EMAIL and PHONE after it.
We don't need all of those here. Point at the ROLE header and click the small × at its end. Do the same for HOW WE MET. Then scroll the table sideways to reach PHONE, and take that one off as well.
Taking a column off only changes this table. Nobody's Role, or Phone, goes anywhere.
Filling it in
Now the table has two kinds of column, and they keep what we type in two different places. Fill both in right in the table. For Project role, click in the cell, click it again to open its list, and pick. For Email, click the cell and type.
| Person | Project role | |
|---|---|---|
| Rosa Neves | already Design lead | rosa@neves.studio |
| Dev Okafor | Developer | dev@okafor.dev |
| Mei Tanaka | Copywriter | mei@tanaka.works |
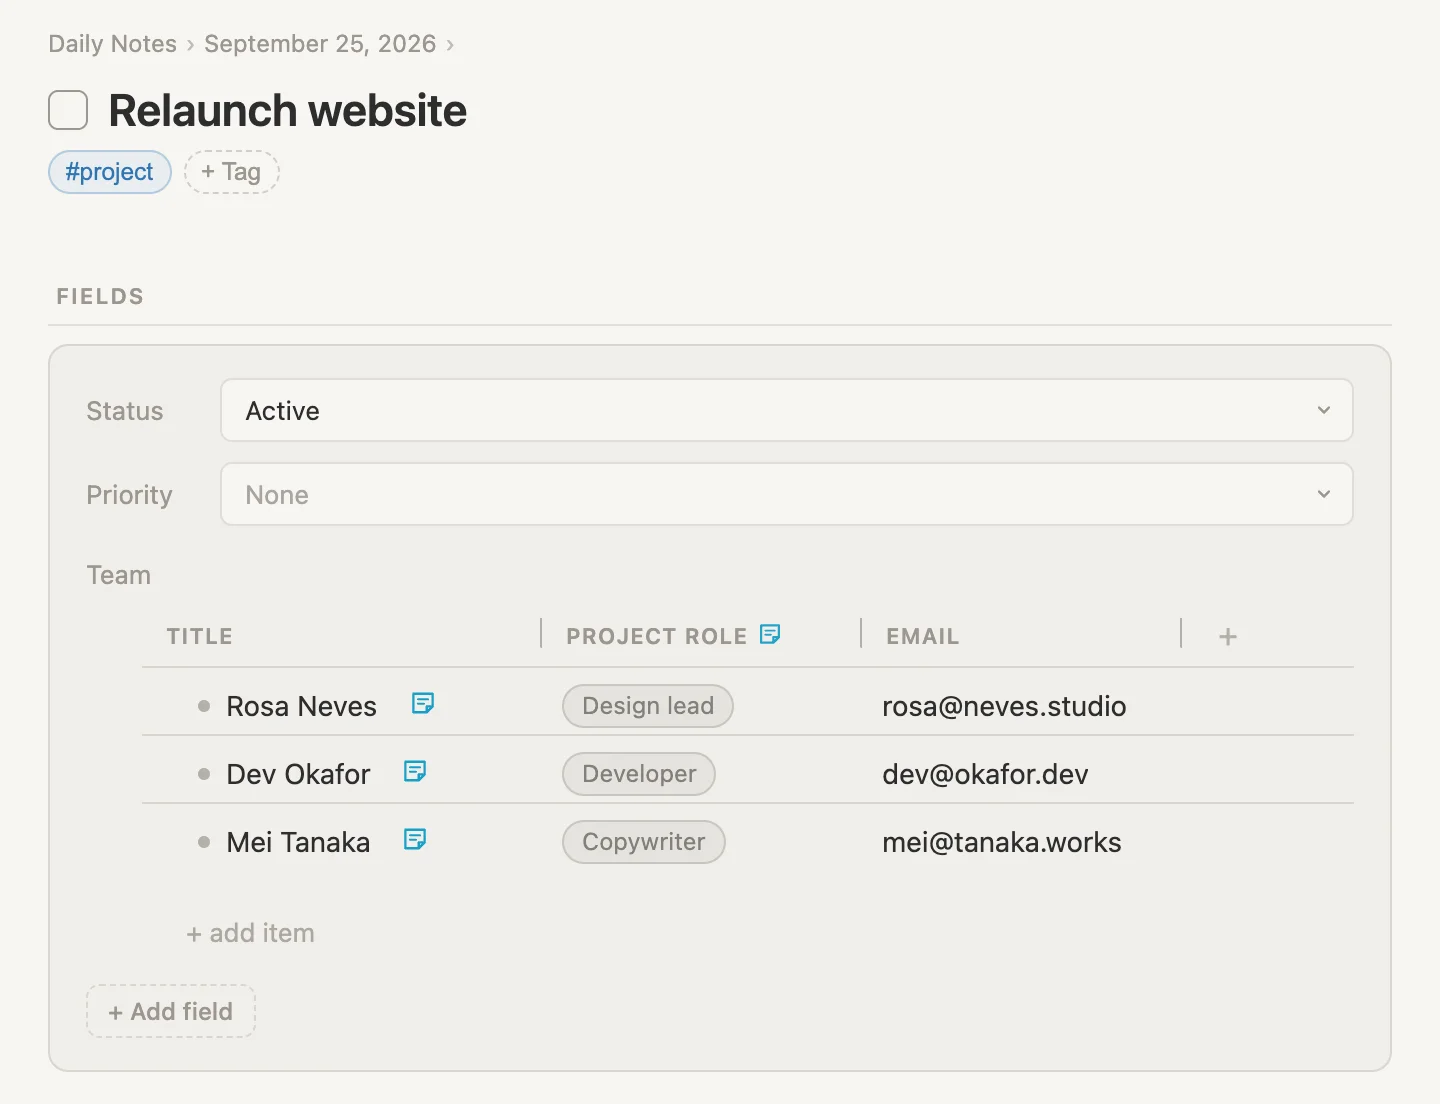
Same table, two very different things. Dev's Developer went into a brand new annotation, on Dev, in the relaunch's Team field. See his sticky note? Mei has one now as well. It's true on this project and nowhere else.
Mei's email went onto Mei's page herself. Click her name and there it is, in the Email field on her own page, the same wherever she turns up.
While we're at it, open Rosa's page and fill in the other two: Phone +351 912 345 678 and Birthday April 12, 1988. That's the last piece of Rosa's page from the top of this walkthrough.
Back to names
On the relaunch, press Cmd-K again and pick Show Team as names.
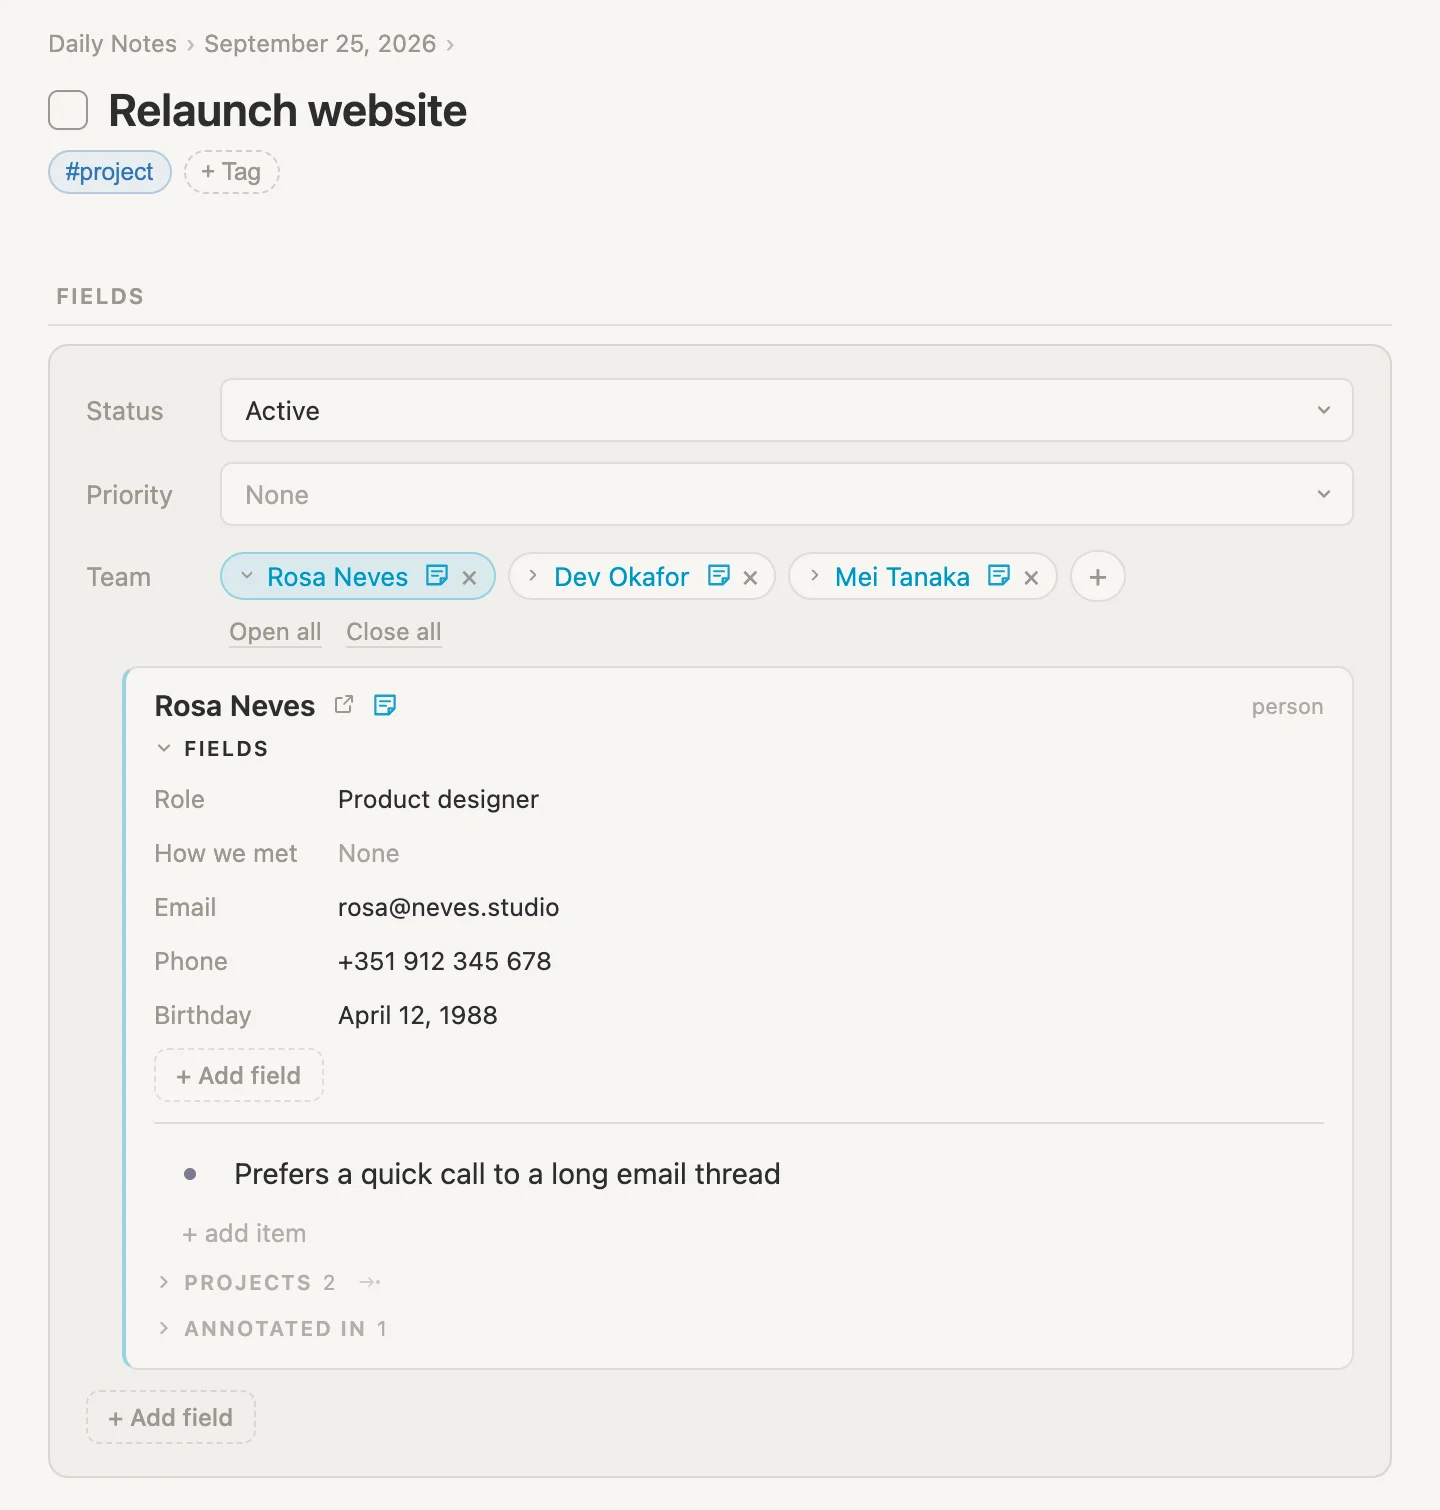
The pills are back, and now all three carry a sticky note. Nothing was lost. (Rosa is still open from the search earlier, and there's the email we typed in the table, on her own fields.) And the table remembers how we left it. Show Team as a table again and it comes back with the same two columns and the same narrow title.
Wrapping up
One new tag, five new fields, two columns that live in a single search, one saved search, one section. And nine annotations, most of them typed straight into a table.
What it gets us: a page for Rosa that knows what she does on every project and when she's presenting at the conference, without anyone writing it there. A run of show for the conference that no speaker's page has to carry. And a team table where each person's role on this project sits right beside their own email.
The ideas underneath it all:
- An annotation is a note about one note in one place. Rosa on the relaunch, not Rosa everywhere, and not the relaunch as a whole. It can hold lines and fields, like any note.
- The sticky note icon says an annotation is there. Click it to open the annotation right where it sits, and again to fold it away. Each place remembers which you left open.
- The other end gathers them up. Rosa's page shows her annotation from every project she's on, and from every search, under Annotated in. And they're the real annotations, so you can change them right there, in situ.
- A column only in one search keeps something that's true of a note in that list and nowhere else. Slot and Travel booked belong to this year's speakers list, not to the speakers.
- A field shown as a table puts its notes in rows. A column with a sticky note is kept on this note's links. A plain column is each note's own field.
- Search reaches inside annotations, and opens them for you when you land.
Nothing here is special to teams. Swap the tags and the same idea keeps the page numbers for a quote on one book, the quantity of each ingredient in one recipe, or one interviewer's score for a candidate. The notes stay what they are. The annotation keeps what's only true where they meet.